
Step-by-step growing, Page 3
- Growth phase
- Flowering and Harvest
- Processing and storage
- Hydroponic growing
- Seedlings and propagation
- Speciality Crops
- Outdoor Growing
- Seeds and Germination
List of articles
Drying and Curing – The Path to a Delicious Harvest
When a grower finally harvests ripe flowers, a moment of satisfaction arrives — and at the same time one of the most important stages of the entire season. The flavour, aroma and effect of the final dried material depend on the way you dry and cure the harvest. A few mistakes are enough for months of work to come to nothing. So how should you dry and cure it so that the result is worth it?
What do you imagine when you hear quality dried material? A strong effect, pronounced aroma or delicate flavour? Probably all of these together. Behind these qualities are cannabinoids, terpenes and other substances that form in the plant and are stored in trichomes. To preserve as much of them as possible, you must handle the harvested plant material carefully during processing. Proper drying and the subsequent refining (curing) determine whether your harvest will smell of fruit or of wet hay.
Different drying methods
 The first step towards a flawless harvest is gentle and slow drying. The aim is not merely to dry the plant material, but to do so in a way that preserves as many active compounds as possible in the dried material. These are hidden in trichomes, microscopic glands on the surface of flowers, leaves and stems, where cannabinoids and terpenes are formed. With rough handling, the trichome heads break off and fall from the flowers in the form of a fine resin-like powder. The trichomes on flowers are the most valuable; they contain the greatest amount of active compounds and have a higher monoterpene content than trichomes on leaves and stems.
The more you handle the plants, the more trichomes you will lose during drying. The gentlest method is to remove only the dried and yellow leaves from the plants and dry them whole, hanging upside down. This method ensures slow drying, which is important because herbs that dry too quickly lose terpenes and have a bitter taste. The optimal drying time is roughly 7 to 21 days at a temperature of 16-20 °C and relative humidity of 55%. During that time, the plant material should lose roughly 70–80% of its weight.
There is always a certain risk of mould during drying. This is especially true for large outdoor plants or those that have already been affected by mould. In such a case, remove all large leaves from the plants before drying. This will increase air circulation around the flowers. The flowers will dry a little better if you separate the plants into individual branches. Alternatively, you can dry the flowers divided into smaller parts on drying nets. Before that, however, do not forget to remove the small petals (wet trim).
You may also be interested in: How to harvest the most fragrant outdoor crop
|
|
Temperature |
Relative humidity |
|
Drying whole plants |
18-20 °C |
50-55 % |
|
Drying by branches without large leaves |
16-19 °C |
50-55 % |
|
Drying on nets |
16-19 °C |
55-65 % |
How to equip a drying room
 A room for drying herbs must be well ventilated and completely darkened. Light degrades both cannabinoids and terpenes, and air circulation is important so that the plant material does not become damp and start to mould. If you do not have a suitable place in the house, a growbox (grow tent) with an activated extract fan will do for drying herbs.
Throughout the drying period, monitor the temperature and humidity in the drying room with a thermo-hygrometer. If the humidity rises too high, the best solution is a dehumidifier, on which you only need to set the desired humidity. When drying in a growbox, place the dehumidifier in the room with the grow tent, not directly inside it, so that the warm air does not dry the herbs too quickly.
You can tell well-dried flowers by the fact that they feel dry to the touch, spring back slightly and break off the stem easily. If the herbs crumble easily between your fingers, that is a sign of over-drying. This is not ideal, but all is not lost. If you place the dried material in a space with higher humidity (above 65%) for one or two days, it will regain some moisture. Check the flowers roughly every 6 hours.
You may also be interested in: FERMBAG: A revolution in drying
Trim and curing
If you did not do so during harvest, after drying it will be necessary to clean the plants of the remaining leaves, especially the small leaves around the flowers (dry trim). Trimming is painstaking work, and we recommend equipping yourself with sharp spring-loaded scissors with a sharp tip. Disposable gloves will also come in handy, because the resin of some medicinal plants can irritate the skin. For cleaning tools and hands, do not forget to add disinfectant alcohol to your basket.
In theory, the dried and trimmed buds can be used immediately; however, you can still improve the quality of the dried plant material. Curing (refining) is a technique in which the dried material is left to mature for several weeks to months under controlled conditions. During this time, residual moisture in the dried material spreads evenly and the plant material loses some chlorophyll, which has a bitter taste.
Curing is usually carried out in glass or metal jars that can be sealed airtight. Fill the containers with the trimmed flowers to about three quarters full so that there is some space for air. You can add a humidity control sachet inside, which will ensure that maturation takes place under optimal conditions. Finally, store the maturing dried material in a dark place with a stable temperature in the range of 15-18 °C.
Depending on the cultivar and personal preference, you can leave the dried material to mature for several weeks to months. During the first week, open the containers every day and allow the dried material to air out once a day for about 20-30 minutes, but be careful about the surrounding humidity. If it is raining outside, the humidity at home can also be around 70-85%, and the dried material will absorb it very quickly. It is therefore a good idea, in rainy weather, to seal the room off from the outside environment before opening the container and measure the humidity in the room where the container with the maturing material will be opened. Before closing it, gently mix the flowers in the container with a clean tool so that fresh air reaches all of them. In the second week of curing, it is enough to open the containers two to three times. In the following weeks and months, air the dried material at least once a week.
For more tips and guides on legal cultivation, visit our Higarden blog for beginners and advanced growers.
Tissue Culture Propagation: The Future of Plant Propagation
Did you know that there is a way to grow hundreds of identical plants from a single cell? Micropropagation is a revolutionary technique that allows commercial and hobby growers to propagate plants from small samples of plant tissue in a sterile environment, giving them new and unprecedented possibilities. Let us take a look at how this method works and how you can try it at home.
What is propagation through tissue cultures?
Propagation using tissue cultures involves growing plants from small samples of their tissue in a sterile environment. The process begins with an explant, a small piece of plant tissue taken from the mother plant. The explant is placed in a sterile container filled with a gel-based nutrient medium enriched with vitamins and hormones that support plant growth. Once the plant tissues are preserved in this way, they can be divided into hundreds or even thousands of genetically identical clones.
This process is remarkable for its flexibility. The tissue can remain in a sterile environment for a long time until it is activated by specific hormones to develop roots and shoots, which allows long-term archiving of plant genes. Thanks to sterilisation, the tissue sample can be freed from all pathogens, pests and diseases, and in some cases it may be the only way to rid plants of viral diseases such as hop latent viroid (HpLVd).
How do tissue cultures differ from seeds and cuttings?
Growers traditionally rely on seeds or cuttings for plant propagation. These methods are effective, but they have their limitations:
Seeds: The main disadvantage of growing from seeds is the unpredictable results. Seeds do not always have 100% germination, and some plants may suffer from unwanted genetic mutations. In the case of growing dioecious plant species, unwanted male plants can be a problem. Last but not least, crop uniformity is not guaranteed with seeds, and plants from the same parents will show greater or smaller differences in appearance and growth.
Cuttings: Propagation by cuttings is faster, and cloned plants are identical to the mother plant. The disadvantage of cuttings is the relatively high risk of transferring diseases and pests from the parent plant to the clones. Cloning also requires consistent maintenance of mother plants, which is demanding in terms of both labour and space.
For more about cuttings, see the article on our blog Cuttings: Plant cloning step by step.
Micropropagation of tissue cultures solves most of the problems associated with growing plants from seeds or cuttings. The sterile environment eliminates pests and diseases, and in some cases even genetic disorders. The plants are genetically identical, and tissue cultures can be stored in small containers that take up significantly less space and require less care than mother plants. Tissue cultures allow growers to produce thousands of plants from a single explant in a short time, which is invaluable especially for commercial large-scale growers. Last but not least, micropropagation can be used to “reset” the plant’s biological clock and rejuvenate old or rare specimens. This method can also be used to germinate seeds that are decades old and restore lost genetic material.
Equipment for tissue cultures for commercial and home growers
For growers who want to try micropropagation of tissue cultures, we offer the revolutionary Athena Tissue Culture Kit. This set contains all the equipment and procedure instructions you will need, whether you are a hobby grower or a professional. Athena Tissue Culture Kit is a unique system that allows you to preserve rare varieties, propagate plants more quickly, and rid them of pests and diseases.
What the Athena Culture Tissue Kit contains
- Flow Hood: The mobile laboratory provides a large space (0.7 m³) with sterile airflow (average speed 0.5–0.9 m/s) and powerful H13 HEPA filters.
- Autoclave: Simplified sterilisation process with one-time setup.
- Pre-prepared culture media: Contains the “Roots” formula for callus formation and “Shoots” for tissue growth.
- Toolbox: A complete set of tools, including a detailed step-by-step procedure.
Would you like to learn more about modern trends in growing and cultivate like professionals? Visit our Higarden blog, where you will find plenty of useful information on indoor and outdoor growing and urban growing.
Cuttings: Plant Cloning Step by Step
Thanks to cuttings, you can easily create genetic copies of your favourite plants. This method offers growers the opportunity to achieve consistent results, optimise growing conditions, and preserve exceptional plants. In this article, we will guide you through the cloning process from A to Z – from preparing the equipment to rooting the cuttings and transplanting them.
It will probably come as no surprise that sowing and germinating seeds are an inseparable part of gardening. However, this is not the only way plants reproduce. In addition to generative propagation (by seeds), plants can also reproduce vegetatively (from part of the plant). This is because plant cells have the ability of totipotency, which means that any of them can develop into an entirely new plant. In today's article, we will focus on a specific case of vegetative propagation, namely cuttings. For completeness, however, let us add that gardeners and growers also propagate plants vegetatively by dividing clumps, layering blackberries or grapevines, separating strawberries, grafting, and propagation by means of tubers.
Plant cuttings
As we hinted in the introduction, vegetative propagation of plants differs from sowing seeds. In the case of cuttings, we take a suitable part from the donor (mother) plant, usually the tip of a healthy branch with several healthy leaves and internodes. We then move the clones into a suitable growing medium, which is usually cubes made of mineral wool or a suitable growing substrate. For freshly cut cuttings to root successfully, they need suitable conditions, above all high air humidity, warmth, and plenty of light.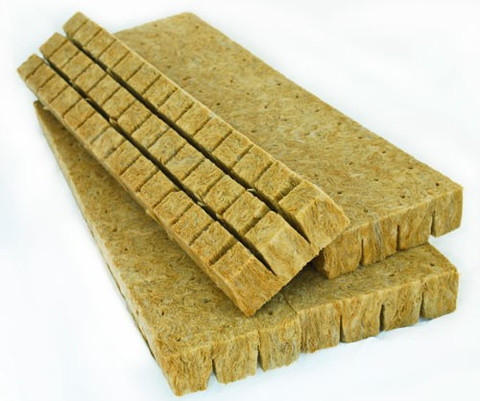
So how do cloned plants differ from those grown from seed? The main difference is that the newly formed offspring is a genetic copy of the donor plant. Clones therefore always have the same sex as the mother plant. One advantage is that, when growing dioecious species, growers do not have to worry about selecting males from females. Another benefit of cuttings is the genetic uniformity of clones. Because the plants come from one mother, they will show identical growth characteristics. Large-scale growers in particular can use cloning to optimise the growing process and achieve consistently reliable results over the long term. Last but not least, cuttings give growers the opportunity to preserve exceptional phenotypes in the form of clones over the long term.
It should be added that cloning also has some disadvantages. The main problem is the risk of transferring genetic disorders, pathogens, and diseases. If the mother plant is infected with one of the plant viruses (e.g. HLVd) or suffers from a genetic mutation, the offspring will be affected in the same way. The same applies to mould and many insect pests, but in these cases it is possible under certain circumstances to treat the clones with pesticides or fungicides. Unlike plants grown from seed, cuttings do not have a main root that grows deep into the ground. Cloned plants are therefore somewhat less suitable for outdoor growing, especially in places where they may face strong gusts of wind and prolonged drought.
Advantages of cuttings
- same sex and genetic uniformity
- uniformity of the crop
- preservation of exceptional plants
Disadvantages of cuttings
- transfer of genetic mutations and viruses
- spread of pathogens and pests
- less suitable for outdoor growing
How to take cuttings step by step
Before you start taking cuttings, first make sure that you have all the necessary equipment. You will need a growing medium, preferably cubes made of mineral wool or a suitable propagation substrate. Cuttings need constant air humidity of around 75-85%, which is easiest to achieve in a small plastic greenhouse (propagator). Clones root fastest at temperatures in the range of 24-27 °C. Lower temperatures slow the process and increase the risk of mould. In the first few days, medium-intensity light (100-200 µmol) with a blue-white spectrum is suitable. After the first roots appear, you can increase the light intensity to double, which will speed up the development of the root system. At this point, it is also suitable to start using root stimulant. You can find grow lighting for growing cuttings and seedlings HERE.
Other necessary equipment
- scalpel
- disposable gloves
- disinfectant (alcohol, Purolyt, hydrogen peroxide solution)
- rooting gel
- thermometer with humidity metre
- container for placing fresh clones
- paper towels
Detailed guide to cloning
To give yourself the best chance of success when taking cuttings, take clones from recently grown branches from plants at the peak of vegetative growth. Before taking cuttings, you can treat the donor plant with one of the special products (e.g. Clonex Mist) that support root formation and strengthen the cuttings' resilience. Always work with clean tools, wear rubber gloves, and do not smoke while working.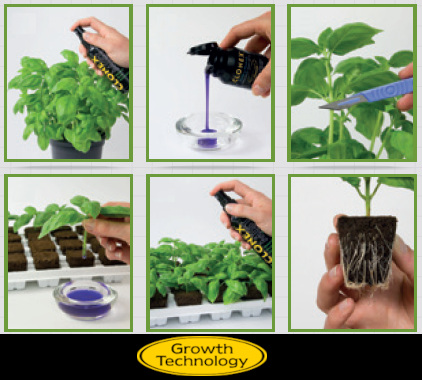
- First remove excess leaves from the branches and leave only a few young leaves at the top. Trim their tips so that 2.5 to 5 cm of the blade remains. The lower part of the future stem should remain bare.
- Cut branches 10-15 centimetres long and immediately place them cut-end first into a prepared container of water.
- Finally, cut the ends of the stems to the same length at a 45° angle. Immediately dip the clones prepared in this way into rooting gel and insert them into the growing medium.
- Place the cuttings under the greenhouse lid or into a propagator and put them under a light source.
- Depending on the plant species and conditions, it will take approximately 7-14 days for the clones to root and be ready for transplanting.
- Throughout the process, check that the growing medium is moist. It should not, however, be waterlogged.
- Towards the end of the process, gradually open the vents on the greenhouse to reduce air humidity and prepare the plants for transplanting.
Aeroponic propagators
Aeroponic propagators are based on a simple principle, in which the ends of the stems are exposed to a mist of oxygenated water. Thanks to the high oxygenation, clones root up to twice as fast as in another growing medium. Another advantage of aeroponic cuttings is that the clones can also tolerate lower air humidity in the range of 50-60%. This makes the subsequent acclimatisation of new seedlings easier.
Finally, for completeness, let us add that in recent years a new modern method of cloning using tissue cultures has also been gaining popularity. We will devote this modern plant propagation technique to one of our future articles, but if you know how to do it and want to try tissue cultures in your grow room, you will find cloning systems for tissue culture on our website.
Would you like to learn more about indoor growing and modern gardening trends? Do not hesitate to visit our Higraden blog.
Growing Diary: With Care, You Will Achieve the Best Bloom
Do you keep a growing diary? It is a question that will probably surprise most growers. The truth is that this somewhat old-fashioned way of keeping records gives the grower a perfect overview of the processes that affect the outcome of cultivation. In addition, keeping a diary is a cheap and easy way to improve at indoor growing.
 Are you wondering what a growing diary is good for? Our memory can often deceive us, and after the harvest it is often difficult to remember where we made a mistake during cultivation. If you write down what you did throughout the entire cycle, you can easily find out at the end what worked and what did not. Overfeeding, incorrect watering or late transplanting? If you have a record of it, you will avoid these mistakes next time. In addition, thanks to systematic monitoring of procedures, you can continuously improve your cultivation. Over time, you will find out which substrate is the most fertile or which combination of fertilisers and lighting produced the best results. All this will help you cultivate more efficiently. Last but not least, a growing diary is helpful whenever you encounter a problem. For example, if you notice yellowing leaves, you can easily look back and see what changed in the previous days. Perhaps you used a new fertiliser, adjusted watering, or the temperature changed. The diary will help you identify the cause and quickly find a solution.
What should you record in a growing diary?
The most important function of a growing diary is a thorough record of the growing environment, plant nutrition and important milestones. Record the dates of sowing, germination, transplanting, the start of flowering and the time of harvest. The timeline will help you track the length of individual growing phases and plan future cycles. Write down which substrate you used, which fertilisers and supplements you gave the plants, and the lighting regime. Every time you water the plants, note the time and amount of watering. If you measure the pH or EC of the nutrient solution, be sure to write these values down every time. Also record the temperature and humidity in the growing area every day. Note how the plants are changing, the colour of the leaves, the growth rate or the onset of flowering.
- Basic milestones (sowing, transplanting, switching to flowering, harvest)
- Materials, fertilisers and equipment used
- Measured values (EC, pH, humidity, temperature, VPD, PPFD)
- Observations (plant development, growth rate, colour, unusual deformities)
- Interventions and unusual events (LST, sprays, pests, mould, environmental fluctuations)
Tips and tools for keeping a growing diary
The great thing about a growing diary is that anyone can do it and you do not need any expensive equipment for it. It is not about writing essays. A few numbers or sentences a day are enough. What matters is consistency and care. Ideally, set aside time every day and spend a few moments with your plants. They will reward you with a plentiful harvest.
- Pen and notebook: It may have been some time since you used a pen and notebook, and of course you can keep a diary digitally as well. However, old-fashioned paper and pencil are still the quickest (and safest) way to record things in this case.
- Digital hygrometer and thermometer: Measuring the temperature and humidity in the growing area should be part of every grower’s routine. We recommend choosing a digital thermo-hygrometer.
- EC and pH metre: Many growing techniques require regular measurement of the EC and pH of the nutrient solution, or the runoff from the substrate. For use in indoor growing, the most suitable are digital EC and pH metres, which provide accurate and reliable measurements.
You may also be interested in: How to measure EC correctly
For more tips and guides for indoor and outdoor growers, visit the Higarden blog.
Grow sprouts or microgreens at home and beat spring fatigue
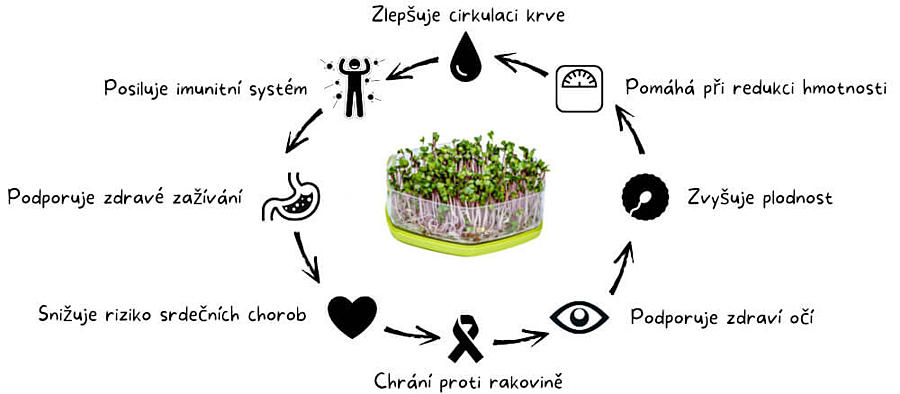 The first spring rays are already slowly awakening nature from its winter sleep, and it is the best time to give your sleepy body a proper dose of vitamins, antioxidants and minerals in the form of juicy microgreens and sprouts that you grow yourself. Not sure how? Do not worry, with our guide to home sprouts and microgreens you can manage it with ease.
Although their inconspicuous appearance does not suggest it at first glance, young vegetables, legumes or cereals in the form of sprouts or microgreens are an excellent source of nutrients, vitamins, minerals, antioxidants and other health-beneficial substances. Some types have up to 40 times higher nutritional value than fully developed plants, and a scientific study (Wojdyło,Nowicka) confirmed that:
- sprouts have effective antioxidant capacity because they are rich in polyphenols and L-ascorbic acid
- microgreens are characterised by a high content of carotenoids, chlorophyll and organic acids, without any sugars
- some sprouts (broccoli, radish, lentils) and microgreens (radish, amaranth, lentils) can be included in the daily diet as superfoods and functional foods
Microgreens or sprouts, what is the difference between them?
The terms sprouts and microgreens are often confused, but they are two different categories of plants. When growing sprouts, we only soak the seeds in water and harvest them before the first leaves appear. The whole process usually takes about a week, and you will not need any growing medium or artificial lighting.
Microgreens grow a little longer than sprouts, usually 7 to 21 days after the seeds germinate, which is long enough for the first small leaves to appear. Unlike sprouts, microgreens require a light source and a growing medium for the roots to anchor into. While you can eat sprouts whole, including the split seed, with microgreens we only eat the above-ground part, namely the stems and young leaves.
What equipment do I need for growing sprouts and microgreens?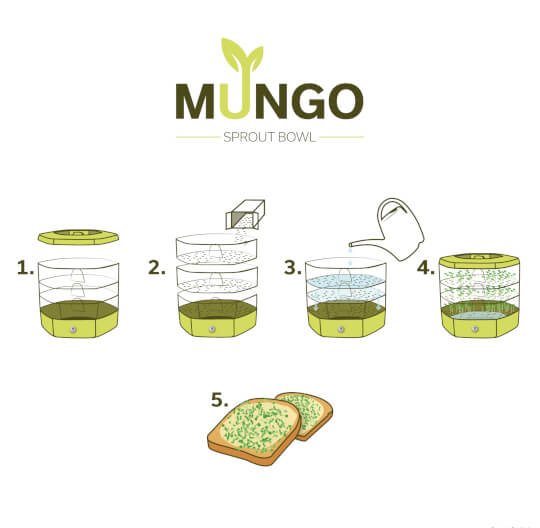
The main differences between growing sprouts and microgreens are the need to use a growing medium and the need for light. Although the process for growing sprouts and microgreens differs in several respects, some equipment can be used for both purposes, and the seeds used for growing sprouts and microgreens are the same.
OUR TIP: Would you like to grow sprouts and microgreens at the same time, but have little space or do not want to invest in two sets of equipment? Try the Mungo sprouting tray Mungo, in which you can grow up to three types of sprouts and microgreens at once, without using any growing medium.
How to grow sprouts
The simplest method for growing sprouts is to spread rinsed seeds in a shallow container and regularly rinse them with water until they germinate.
- First, cover the seeds with cold water and remove any impurities that float to the surface. Soak the seeds for 8-12 hours (overnight) or until the husks soften.
- Pour off all the water and let the seeds drain on a tray with drainage.
- Spread the seeds evenly, place the perforated tray on the base tray and leave the seeds to germinate in the fridge.
- Rinse the seeds every day with clean cold water and let them drain again until they germinate.
Growing equipment for growing sprouts
 How to grow microgreens
When growing microgreens, we do not soak the seeds, but sow them directly into a moistened growing medium. This can be mats made of mineral wool or other materials, or horticultural growing substrate that does not contain added nutrients (for example, seed and propagation substrate, light-mix, coconut substrate).
Microgreens also need a light source; you can grow them on a windowsill or use grow LED lights for microgreens. If you choose artificial lighting, it is more advantageous to grow microgreens in a grow tent, where they will have perfect conditions for growth and you will make better use of the electricity invested.
- Fill the tray with growing medium. If you are using soil or a similar substrate, fill the container to the brim and press it down lightly.
- Moisten the substrate with a sprayer.
- Sow the seeds very close together so that you achieve the richest possible harvest.
- Place the growing container on a window or under a grow LED light.
- Keep the substrate moist until it is time to harvest.
Growing equipment for growing microgreens
- tray or microgreens sowing tray
- growing medium (mineral wool growing mats or hemp fibres, perlan, horticultural substrate)
- hand sprayer
- grow LED light for microgreens (optional)
- grow tent for microgreens (optional)
How to choose seeds for growing sprouts and microgreens
A number of edible cereal species can be grown as sprouts or microgreens (barley, wheat, maise, oats, rice) or legumes (lentils, peas, chickpeas, beans). For growing sprouts and microgreens, use only seeds that have not been treated with pesticides or other chemical substances.
However, all sprouts and microgreens have one thing in common: they are packed with nutrients and flavour that will certainly pleasantly surprise you with its intensity. Do not be afraid to experiment and alternate plant species. You can also try various seed mixes for growing microgreens or our practical microgreens growing kits for beginners. To begin with, we include a list of our most popular sprouts and microgreens.
Pruners
When harvest time comes, efficiency and precision are key factors. Trim, or pruning, is the process of removing leaves and keeping the flower as clean as possible. Traditional hand shears can be a reliable tool, but if you are looking for a faster and more efficient way to trim flowers, trimmers or shears may be very useful. In this article, we will look at the different types of trimmers and who they are suitable for, and we will also compare the time saved when using shears and trimmers.
Example of time savings: Trimmers for flowering herbs can trim faster than any other tool, which significantly reduces the time needed to process a large harvest. It is important to realise that the choice of trimmer depends on your needs and the scale of the harvest. Hand shears are suitable for small growers and amateurs, while electric trimming machines and manual trimmers for flowering herbs are suitable for larger and commercial growers. Using the right trimmer can significantly increase your productivity and save time when harvesting flowering herbs. Manual and electric trimmers save time by hours; typically, trimming time is reduced by 2-4 times compared with hand trimming with shears.
Hand shears:
Hand shears are a traditional tool for trimming flowering herbs. They guarantee precise cutting and minimal losses. They are suitable for smaller harvests and growers who prefer detailed control. Hand shears are also affordable and do not require electricity.
Example for this group: PF Garden Shears, large curved
More in the category Shears
Manual trimming machines:
Manual trimming machines are a middle ground between hand shears and electric machines. They are easy to transport and provide faster trimming than hand shears. These machines are suitable for growers who need to trim medium-sized harvests.
Example for this group: VF Trimmer 50 cm (19")
More in the category Manual trimmers
Electric trimming machines:
Electric trimming machines are an excellent choice for trimming larger harvests. They are faster than hand shears and require less physical effort. These machines are ideal for commercial growers and people who need to process large quantities of flowering herbs.
Example for this group: VF Table Trimmer, 3 speeds
More in the category Electric trimmers
Industrial trimmers:
These are semi-automatic and automatic machines designed specifically for trimming flowering plants in huge quantities. They are the fastest and most efficient choice for large growers and industrial operations. Trimmers allow automated trimming of up to 16 kg per hour.
Example for this group: Sunflower Automatic Trimmer L - Light
More in the category Electric trimmers / Sunflower and Master Trimmer
Preparing flowers for trimming is an important step that ensures efficient and clean cutting.
The following steps will help you prepare flowers for trimming:
Harvest at the optimal time: Harvest flowers at the optimal ripe stage, which depends on the specific species and its purpose (for example, medicinal flowering herbs are harvested at a different stage than herbs for textile production). Avoid harvesting too early or too late so that the plants are in the best possible condition.
Choose a suitable working environment: Trimming should take place in a clean, well-lit and well-ventilated environment. This ensures that the work is comfortable and hygienic, reducing the risk of mould.
Cut away large leaves and stems: Before trimming, remove large leaves and coarse stems. This will make access to the flowers easier and minimise the risk of damaging the flowers with the trimmer. At industrial scale, the machines will take care of this for you.
Prepare your tools: Make sure that you have all the necessary tools and materials ready, including trim, gloves, glasses and a container for collecting removed leaves and flowers.
Clean the plants: If you have plants outdoors and they are dirty, rinse them with clean water and let them dry.
Start trimming carefully: Begin trimming carefully and proceed slowly. Make sure that you remove excess leaves, but avoid damaging or losing valuable trichomes.
Drying: After cutting, place the flowers on drying nets. In the spaces, monitor temperature and humidity so that you achieve 21°C and 55% humidity. The drying time depends on your conditions; it can take 4-12 days, but even longer. The right time to move them into containers comes when the stem cracks but does not break completely. We do not recommend speeding up drying, as you will lose aroma and flavour.
Store the harvest properly: After trimming, place the flowers in suitable containers or sealable containers to preserve freshness and aroma. Open the containers once a day for 20-30 minutes to release internal moisture.
Be careful with cuttings: Cuttings (removed leaves and flowers) can be used to make oil, tinctures or other products. Be careful not to lose them and use them efficiently. Tools and devices for processing can be found in the category Pressing / Extraction.
Preparing flowers for trimming requires care and attention to detail. Following these steps will help you ensure clean and efficient trimming and keep the quality of the harvest at the highest level.
If you have any questions or need advice on choosing, our specialists are available at info@higarden.eu.
We also recommend these products:
- VF Table Trimmer, 3 speeds, electric
- Icer PF pollen separation washer + set of 3 separation bags
- Trim Bin Harvest Cut Tray, complete set
What to read next?
- Everything for the autumn harvest
- How can you increase the terpene content in the crop?
- Prima Klima - odour filters with activated carbon you can rely on
What to Do with Harvest Residues
 The main goal of most growers is to harvest unpollinated flowers full of active compounds and terpenes. But what should be done with the “leftovers” — that is, trim, leaves, stems and roots? For most growers, these are merely waste that ends up in the bin or compost, but that is a great shame. These parts of the plant contain valuable substances that can be turned into home remedies, cosmetics or treats.
Harvest time is always a time of joy for growers, but it also brings more work. Bear in mind that if you decide to make further use of the leaves or roots of the plant, you should treat them with similar care during harvesting and drying as you would the flowers. When drying, ensure the correct conditions, namely low air humidity of around 55%, a temperature in the range of 18-21 °C, darkness and a supply of fresh air. Under no circumstances should you use mouldy dried material or plants treated with pesticides for further processing.
You may also be interested in: How to harvest the most fragrant outdoor crop
Sugar leaves
The English term “sugar leaves” refers to the small leaves around the flowers that are covered in trichomes and contain a relatively large amount of cannabinoids and terpenes. You can prepare effective extracts, tinctures or ointments from them, or use them in a similar way to the flowers (sifting resin, vaporising herbal blends).
Do not forget that CBD occurs in dried material in its acidic form (CBDA), which is inactive when ingested. In order for CBDA to be converted into CBD, the dried material must first be decarboxylated, that is, heated to a sufficiently high temperature for a certain period of time. Decarboxylation takes place to some extent during the cooking of oil or ointment itself, but for better effects of the final product it is better to heat-treat the dried material first.
- Enriched butter or oil: Cannabinoids bind very well to fats, so cooking dried material in butter, oil or another fatty carrier (coconut oil, lard) is a very effective extraction method. Simply heat an appropriate amount of dried material slowly at a temperature of about 80 °C for 2-3 hours and then strain it.
- Homemade herbal ointment: There is a great deal of evidence that CBD and other cannabinoids are very effective when applied topically, especially for pain, eczema and skin injuries. You can use medicinal petroleum jelly, coconut or olive oil, shea butter or lanolin as the base for a homemade ointment. The procedure for preparing a basic herbal ointment is simple. Add approximately 20 to 50 grams of dried material to one kilogram of carrier and heat the mixture in a water bath or in an oven set to a low temperature for about 2 hours. The temperature of the mixture should not exceed 80 °C, so that the cannabinoids are not degraded. You can then strain the mixture or leave it to cool and repeat the heating process several times in order to extract the maximum from the dried material.
- Tincture: As with fats, alcohol is also an excellent tool for extracting active substances from herbs. The “green dragon”, or herbal tincture with a high alcohol content, was a common remedy for pain or insomnia in the past. Preparation is easy. Add approximately 10 grams of decarboxylated dried material to 200 ml of strong alcohol and seal it in a bottle or jar. Leave the mixture of herbs and alcohol to macerate for several weeks at room temperature in a dark place. Finally, filter the mixture through a coffee filter.
- Sifting resin: Like flowers, the leaves around them contain a significant amount of trichomes with a stalk and head, in which active substances and terpenes are hidden. The trichomes can be separated from the rest of the dried material mechanically or with a suitable solvent. The result is a concentrated “resin” (hashish, ice hash, rosin, resin) with a high proportion of active substances and terpenes. Sifting resin through a fine sieve (so-called dry sift) is one of the oldest methods of producing herbal concentrates.
- Vaporisation: Inhalation of vapours rich in active substances and terpenes is a very effective and fast way of consuming medicinal herbs. For this purpose, thoroughly cleaned, dried and mature flowers without seeds are most suitable, but the leaves around the flowers also conceal medicinal potential. However, the consumer must be prepared for the fact that they do not have such a delicate flavour. A great way to give less aromatic dried material a pleasant scent is terpene sachets.
You may also be interested in: Drying and curing – The path to a delicious harvest
Large leaves
Compared with those on the flowers, the trichomes on large leaves contain a very small amount of cannabinoids and valuable monoterpenes. Nevertheless, they are rich in antioxidants, chlorophyll, fibre, minerals and vitamins, which makes them an excellent ingredient for the kitchen. You can also process them into ointments, but bear in mind that a larger amount of dried material will be needed than if you used flowers or sugar leaves.
- Green smoothie: Add fresh leaves to your favourite smoothie.
- Herbal tea: Pour hot water over the dried leaves and leave to infuse. The infusion will have an earthy flavour and calming effects. You can also add other herbs to the herbal tea, such as mint, lemon balm or even ginger and honey.
- Salads: You can use the leaves in salads. They have a distinctive flavour that pairs wonderfully with mustard dressing, strong cheeses and fruit.
Roots
Roots are probably the most overlooked part of the plant among growers, yet they have a long tradition in folk medicine dating back thousands of years. Ancient Chinese, Greek and Roman texts already describe decoctions, compresses and pastes made from roots used against pain, inflammation, cramps or bleeding. Even in the 18th and 19th centuries, they were recommended for rheumatism, inflammation or urinary problems. Although roots contain only trace amounts of cannabinoids, especially CBD, they also contain friedelin and epifriedelanol, which are known to have antioxidant, anti-inflammatory or anti-cancer effects.
- Tincture: Roots are a great ingredient for the “green dragon” whose preparation we described above.
- Balm or ointment: You can also add roots to a herbal ointment. First dry them and then crush them into pieces or a fine powder. Then add the roots to the herbal ointment and proceed according to the instructions above.
Stems
Of all the residual parts of the plant, stems contain the fewest active substances, but they are rich in cellulose and lignin, that is, strong plant fibres. The best use is composting or mulching, or you can make decorations from them. We do not recommend using dried stems as supports for plants, because they may become mouldy and spread mould spores into the surroundings.
For more tips and guides for beginner growers as well as experienced growers, visit the Higarden blog.
LST - plant shaping and training techniques
How can you easily influence the shape of plants so that you get the most out of them? With proper training, you can achieve a rich harvest even from a smaller space. We have put together an overview of the most popular techniques used by both hobby growers and professional cultivators.
Experienced growers know that yield is not only about genetics or nutrition. The plant’s structure also plays a decisive role. Techniques such as supercropping, schwazzing or ScrOG make it possible to adjust growth in a targeted way, increase lighting efficiency and achieve significantly better results. Let us look at how they work and when to use them.
Topping: Trimming the tops
A basic technique that every grower should know. It consists of simply trimming the tops of the plants so that branching occurs at that point. Most growers trim young plants for the first time once they have three sets of true leaves, with the exception of some specific growing styles (for example SoG). After trimming, two new tops grow from the main stem and four side branches one level lower grow faster. The plant should then have six new tops at roughly the same height.
You can trim more than once, but only during the vegetative (growth) phase. After switching to flowering, removing the tops would only deprive you of future buds. The more often you trim the plants, the bushier they will be.
Fimming: Pinching the tops
A top-pinching technique that is said to have originated by accident, which is also where its English name F*** I Missed comes from. Fimming consists of trimming the top shoots so that about 20% remains on the plant. When successful, the plant creates four or more new tops close together instead of two. The result is low plants with buds packed closely together and a high yield.
Defoliation: Removing leaves
Leaves are where photosynthesis takes place and are indispensable for plants. Nevertheless, most growers regularly remove leaves from their plants. Usually this is done to improve the penetration of light and air through the canopy, which helps prevent mould and increases yields. However, defoliation must not be overdone, and it is necessary to know when and which leaves to remove.
During the vegetative phase: Among growers, there is a widespread myth that removing large leaves helps plants direct energy into forming new tops. In reality, this slows growth. Therefore, during the growth phase, remove only leaves that shade lower branches, grow inwards towards the plant, touch the substrate or are in the shade. Also remove yellowing or dried leaves.
During flowering: Although plants also need leaves during flowering, careful defoliation helps create a better microclimate and prevents mould. Especially in indoor growing, it is a good idea to remove leaves from the lowest levels where no light reaches. Likewise, remove larger leaves that shade ripening buds. As harvest approaches, regularly remove yellowing and drying leaves as well.
Schwazzing: Extreme defoliation
Leaves that receive enough light photosynthesise and create carbon, which is a source of sugars for the other parts of the plant. On the other hand, shaded leaves store carbon and photosynthesise only minimally. Therefore, removing shaded leaves helps plants make better use of the available carbon and leads to higher yields.
Schwazzing is a method popularised by J. Haupt in the book “Three A Light”, which consists of repeated extreme defoliation during the first three weeks of flowering. The result is shorter plants with long buds, including on the lower branches.
How to do it: On the first day of flowering, remove all large (fan) leaves. This will not only increase the permeability of the canopy, but also force the plants to focus on developing new leaves instead of elongating the stems, so they will remain more compact and will not stretch as much. Do not forget that by removing the large leaves, your plants have lost a significant reserve of nutrients. Over the next ten days, increase the nutrient dose by about 20% with a formula that is higher in phosphorus and potassium (flowering formula).
Carry out the second defoliation on day 20 of the flowering phase and again remove only the large leaves. Take care not to damage the developing flowers. In the third week of flowering, the plant has already passed the stem-elongation phase and, thanks to the first trimming, the buds should be growing close together. After the second trimming, the flowers will develop close together and the result will be long buds. One of the advantages of schwazzing is that, unlike the traditional method, there is no need to trim the lower branches, because they will also receive enough light thanks to the absence of leaves and you will harvest nice buds on them.
ScrOG: Weaving into nets
Screen of Green (ScrOG) is a plant-training technique that shapes plants into a horizontal plane using a net or grid. This has countless advantages, especially in indoor growing under artificial lighting. If you leave your plants unattended, they will always grow more upwards than outwards. The main branch will then be too close to the grow light, while the tops in the lower levels will receive too little light. The aim of weaving into a net is to create a uniform surface of tops that all receive the maximum energy from the lights.
How to do it: Place the support net 20-30 cm above the base of the plant. Start weaving the tops as soon as they grow 5 centimetres above the mesh openings. Gradually guide the main branches in all directions, and once almost the entire net is filled, switch to flowering and continue weaving for the next two to three weeks until full flowering begins and the plants stop stretching.
LST: Bending stems
LST (Low Stress Training) is a gentle plant-training method in which branches are slowly bent and tied down. Bending stems can be used in many ways, from spreading the canopy and exposing lower branches to light to training photogenic cannabonsaïs. Alternatively, bending can be used to deal with overgrown plants in the early flowering stage.
How to do it: Using soft tying wire, string or plastic clips, start bending the main stem and later also the side branches away from the centre of the plant. This will expose more leaf area to the light and encourage the growth of new shoots. Carry out LST exclusively during the vegetative phase and in the first weeks of flowering, while the stems are still flexible.
Supercropping: Breaking stems
Supercropping is a technique in which you deliberately disrupt the internal structure of the stem so that it bends but does not break. The plant responds to the stress by strengthening the damaged area and growing more intensely in other parts. Breaking stems is one of the advanced techniques and requires a steady hand.
How to do it: Choose a flexible stem in the growth phase and gently squeeze and massage it between your fingers until it gives slightly. Then bend the shoot in the desired direction. If the branch does not want to stay in the new position, tie it down or support it. Within a few days, the plant will form swollen joints on the damaged stem.
Training is a way to achieve better results without having to change nutrition or lighting. Start with simple techniques such as topping or LST, and gradually discover what suits your plants best.
Are you interested in news from the growing sector and tips for both beginner and advanced growers? You can find all this and much more on our growing Higarden blog.
How to Plant in Spring: Choosing the Right Location and Preparing the Soil
It is hard to deny that the right location and fertile soil are the basic prerequisites for successful cultivation. There is no point trying to grow tomatoes, for example, in a forest, where the soil is acidic and trees provide shade. But how do you find the perfect place for your plants? We will advise you, whether you live in a city and have only limited space for growing, or, on the contrary, cannot decide where in your spacious garden to plant your plants.
Choosing a suitable place for growing is not a matter of opinion, but mainly of balancing your priorities and the needs of the plants. The most important factors you should consider before choosing a growing site are the amount of light, proximity to a water source and soil quality.
Sunlight
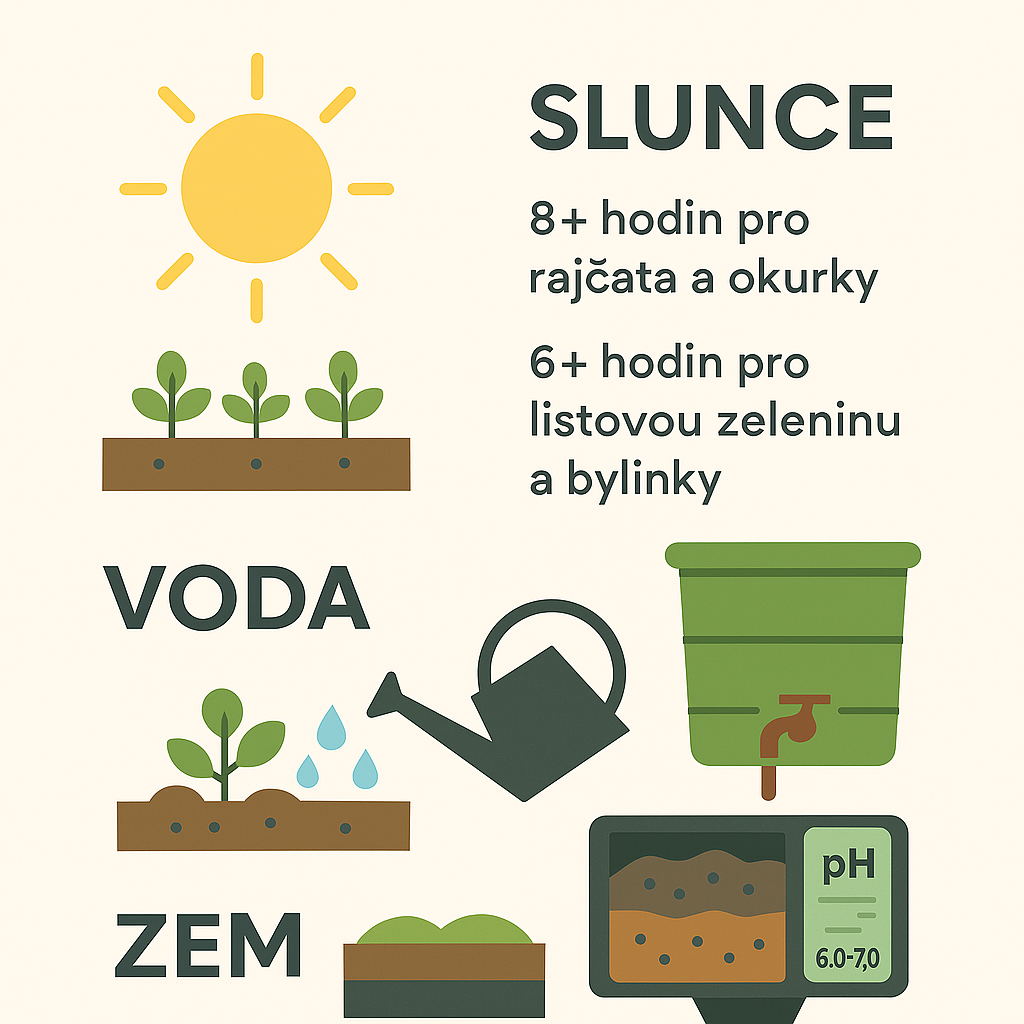 When growing, the more light reaches the plants, the better. It sounds simple, doesn’t it? However, few people are lucky enough to live in a place where there are no tall buildings, trees or fences. When planning, follow the rule that, if possible, the growing site should not be shaded from the south. Even a low fence on the south side of a bed will block a great deal of sunlight.
Most flowers and crops, such as tomatoes, cucumbers or medicinal plants, need 8 or more hours of direct sunlight a day. The same applies to perennial berries or citrus plants. These plants will survive in a site with less light, but they will produce far fewer flowers and fruits. However, there are also species that will thrive in shadier locations. If your garden receives at least 6 hours of light a day, you can grow peas, beans, lettuces and herbs.
You may also be interested in: Light spectrum and its effect on plant growth: Outdoor vs. greenhouse vs. indoor
Proximity to a water source
Rain is the cheapest and best source of water for outdoor growing, but nature is unpredictable and most plants do best when they have a regular watering regime. When choosing a growing site, do not forget that you will need to water. You can do this by hand, or use an automatic irrigation system.
Place a barrel or water tank near the growing site so that you can collect rainwater in it, or where it can be easily filled from the tap. This is not only about your convenience, but also about the fact that water for watering plants should not contain chlorine. Therefore, if you draw watering water from the mains supply, it is a good idea to let it stand in the tank for at least a day before use.
You may also be interested in: What you need to know about the water you use for watering
Soil quality
Whether you are planning to grow in a bed in open ground, in a greenhouse, or on a balcony or terrace in pots, fertile and high-quality growing substrate is a prerequisite for success. Most plants do best in neutral to slightly acidic, well-drained soil (pH 6.0 – 7.0) rich in organic matter. Growing substrates for growing in pots usually contain a mixture of soil, compost and perlite for aeration. If you are growing in beds in open ground, some dirty work awaits you.
You may also be interested in: How to choose a horticultural substrate
How to prepare bed soil for growing
- Thorough clean-up: Remove weeds, fallen leaves and the remains of plants and mulch from the previous season from the bed. The aim is to expose the loose soil.
- Loosening and adjusting soil pH: Loosen the exposed soil by digging over the top layer with a spade to a depth of about 10 to 15 centimetres. If the soil in your garden is heavy or clayey, enrich it with compost or humus. If you find that the existing substrate is particularly infertile or stony, the easiest option is to build a raised bed in that place. During loosening, you can also lime the soil, which will help neutralise acidity. Analogue or digital pH metres are used to measure soil pH.
- Spring fertilising: In the spring months, plants mainly need enough nitrogen, which you can add to the soil, for example in the form of compost, vermicompost (humus), guano or fertilisers with a higher nitrogen content. In spring, you can also add wood ash to the soil, which contains phosphorus that supports root growth in young plants.
You may also be interested in: Prepare the garden for spring!
More tips on growing and gardening for indoor and outdoor use can be found on the Higarden blog for growers.
Start with hydroponics! We have selected 4 hydroponic systems suitable for beginners
Hydroponics is a modern way of growing plants without using soil, which allows for rapid growth and higher yields. Whether you have limited space for growing or want to use water and fertilisers efficiently, hydroponic systems are the ideal solution. In this article, we will look at the best hydroponic systems for beginners.
Hydroponics consists of growing plants without using soil and is an excellent solution for those who do not have access to an outdoor garden. Instead of soil, plants grow in a nutrient solution or inert medium, such as expanded clay, coconut fibres or rockwool. In a home hydroponic garden, you can grow plants all year round and they will grow faster than when grown outdoors. For beginners, the most suitable are 4 types of hydroponic systems: passive (AutoPot), capillary (Atami Wilma) DWC (PLANT!T) and ebb and flow (ebb and flow). Systems for more advanced growers include NFT and aeroponic systems.
Main advantages of hydroponics
- Higher yields: Plants always have access to nutrients and water, grow faster and produce larger fruits.
- Better control of conditions: In hydroponic growing, it is easy to regulate the pH and EC of the nutrient solution and achieve optimal growing conditions.
- Lower water and fertiliser use: Compared with traditional growing in soil, hydroponics uses up to 90% less water and makes better use of fertilisers.
- Fewer pests and diseases: Growing without a soil substrate significantly reduces the risk of attack by pathogens or insect pests.
- Ability to grow all year round: In a hydroponic garden, your plants will always have everything they need, regardless of the outdoor weather.
AutoPot
AutoPot is a passive hydroponic irrigation system that works without electricity or pumps, thanks to the patented AQUAvalve, which automatically regulates the supply of nutrient solution to each plant. As soon as the plant uses up the available water, the valve opens again and replenishes it from the reservoir to the optimum level. Suitable growing media for the AutoPot system are coconut substrates and expanded clay.
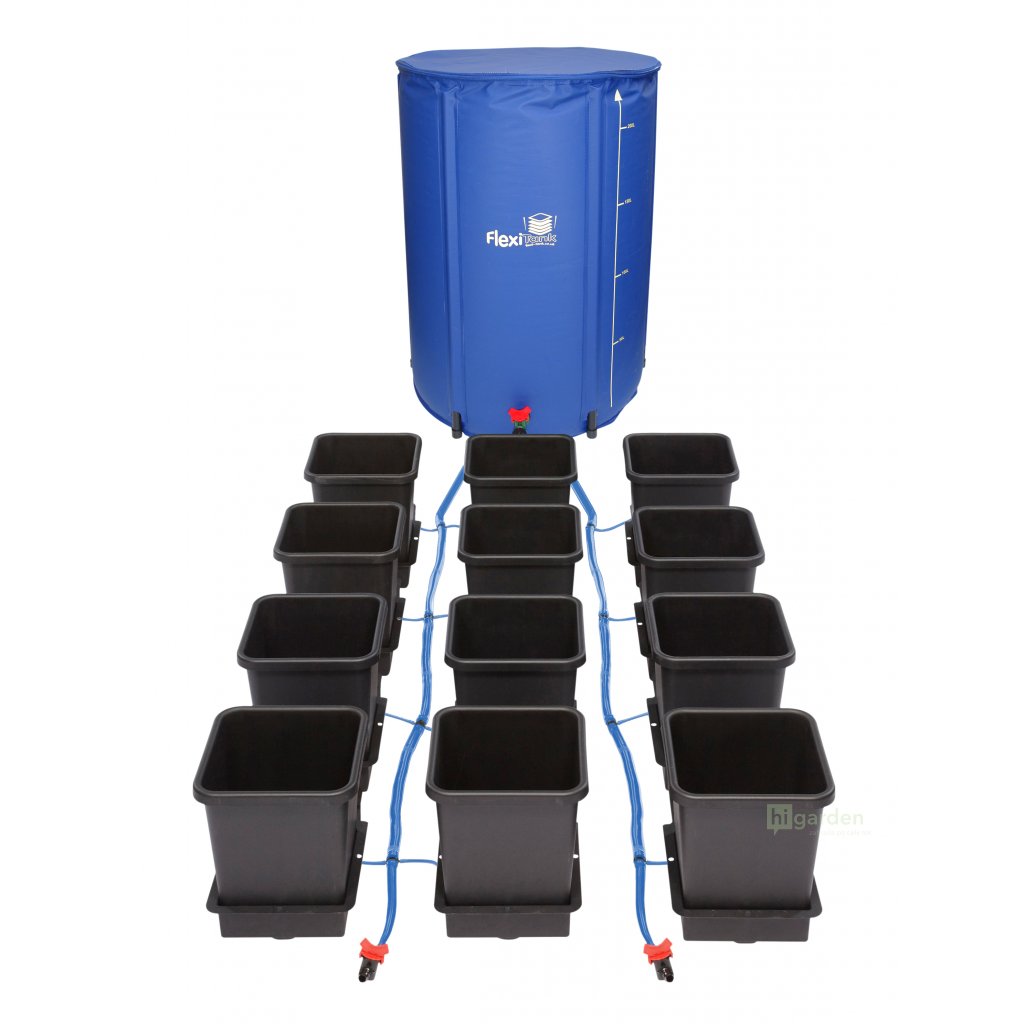
- Without electricity or pumps: Ideal for places without access to electricity.
- Automatic regulation: Plants always receive exactly as much watering as they need.
- Quiet operation: Thanks to the absence of pumps, AutoPot operates completely silently.
- Easy growing: Once the tank is filled, you hardly need to look after the plants.
- Modular system: You can easily adapt AutoPot to the number of plants and the size of the growing space.
Atami Wilma
Atami Wilma is an active hydroponic system that works on the principle of drip irrigation. Plants are placed in separate pots filled with inert medium, and the nutrient solution is supplied to them by a pump through capillary tubes. Excess solution flows back from the tank and is used again. Suitable growing media for Atami Wilma systems are expanded clay, coconut substrates, perlite or rockwool.
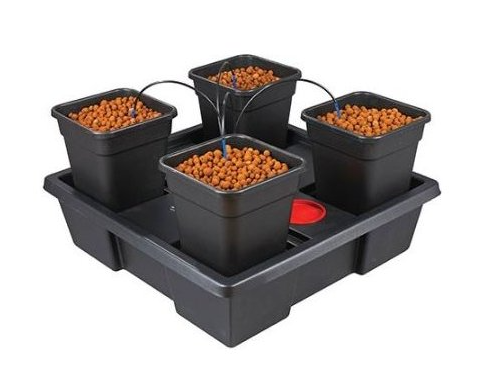
- Optimal plant nutrition: Drip irrigation allows even and precise dosing of the nutrient solution.
- Efficient recirculation: Excess nutrient solution returns to the tank, which reduces fertiliser waste.
- Flexibility: Atami Wilma is a modular system and allows different types of plants to be grown in the same space.
- Suitable for larger plants too: The pots are also designed for medium-sized and larger plants, so you do not have to be limited in any way.
PLANT!T
PLANT!T hydroponic systems use the DWC (Deep Water Culture) method, in which the plant roots are submerged in a nutrient solution that is oxygenated by an air pump. Thanks to the high availability of oxygen and nutrients, plants in DWC grow very quickly and develop a branched root system. When growing in PLANT!T hydroponic systems, the plants are held in hydroponic baskets instead of a growing medium.
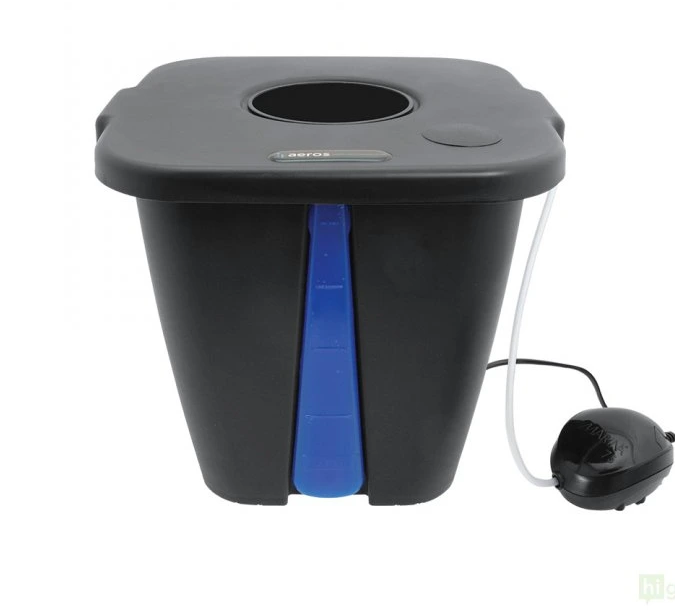
- Maximum root oxygenation: Oxygenating the water with bubbles provides the roots with the perfect environment for rapid growth.
- Efficient use of nutrients: Plants absorb nutrients directly from the nutrient solution.
- Easy maintenance: With PLANT!T systems, it is enough to check the pH and EC of the nutrient solution and occasionally top up water and fertilisers.
- Suitable for larger plants too: PLANT!T systems are designed for growing larger fruiting plant species, such as tomatoes or chilli.
Ebb and Flow
The Ebb and Flow system, also known as Flood and Drain, works on the principle of regularly flooding and draining the growing container with nutrient solution. The plants are arranged on the bottom of the flood tray, where a pump brings water from the tank at regular intervals. After the tray is flooded, the solution is gradually pumped back into the tank, bringing fresh oxygen to the roots. When growing with the ebb and flow system, the plants are planted in an inert substrate, for example in rockwool cubes, expanded clay or coconut substrate.
- Natural balance: Thanks to alternating flooding and drying, the roots always have enough oxygen and moisture.
- Water and nutrient savings: Excess solution is drained back into the irrigation tank.
- Flexibility: In flood trays, you can grow any number of different plant species and handle them easily.
- Easy maintenance and reliability: Thanks to their simplicity, ebb and flow systems are very reliable.
If you would like to learn more about hydroponics and other gardening techniques, visit our blog and discover more tips and tricks for successful growing.