Grow your own sprouts or microgreens at home and banish spring fatigue
 The first spring rays are already slowly awakening nature from its winter sleep, and it is the best time to give your sleepy body a proper dose of vitamins, antioxidants and minerals in the form of juicy microgreens and sprouts that you grow yourself. Not sure how? Do not worry, with our guide to home sprouts and microgreens you can manage it with ease.
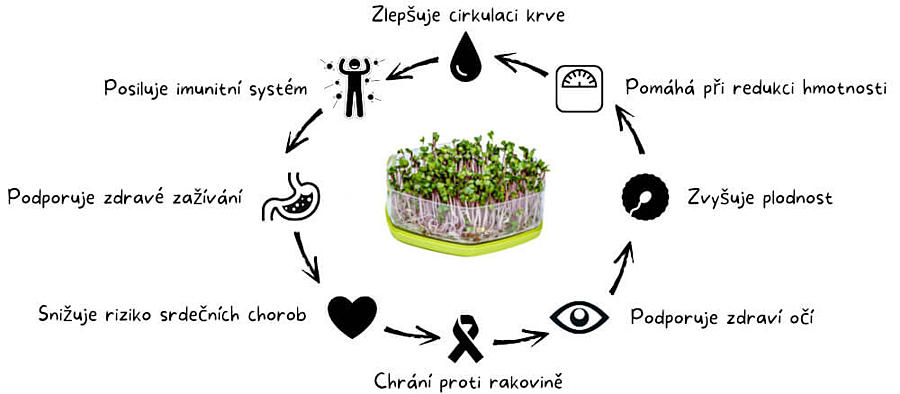
Although their inconspicuous appearance does not suggest it at first glance, young vegetables, legumes or cereals in the form of sprouts or microgreens are an excellent source of nutrients, vitamins, minerals, antioxidants and other health-beneficial substances. Some types have up to 40 times higher nutritional value than fully developed plants, and a scientific study (Wojdyło,Nowicka) confirmed that:
- sprouts have effective antioxidant capacity because they are rich in polyphenols and L-ascorbic acid
- microgreens are characterised by a high content of carotenoids, chlorophyll and organic acids, without any sugars
- some sprouts (broccoli, radish, lentils) and microgreens (radish, amaranth, lentils) can be included in the daily diet as superfoods and functional foods
Microgreens or sprouts, what is the difference between them?
The terms sprouts and microgreens are often confused, but they are two different categories of plants. When growing sprouts, we only soak the seeds in water and harvest them before the first leaves appear. The whole process usually takes about a week, and you will not need any growing medium or artificial lighting.
Microgreens grow a little longer than sprouts, usually 7 to 21 days after the seeds germinate, which is long enough for the first small leaves to appear. Unlike sprouts, microgreens require a light source and a growing medium for the roots to anchor into. While you can eat sprouts whole, including the split seed, with microgreens we only eat the above-ground part, namely the stems and young leaves.
What equipment do I need for growing sprouts and microgreens?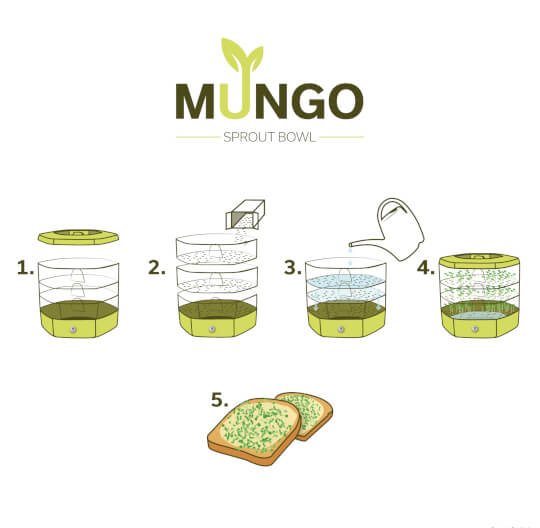
The main differences between growing sprouts and microgreens are the need to use a growing medium and the need for light. Although the process for growing sprouts and microgreens differs in several respects, some equipment can be used for both purposes, and the seeds used for growing sprouts and microgreens are the same.
OUR TIP: Would you like to grow sprouts and microgreens at the same time, but have little space or do not want to invest in two sets of equipment? Try the Mungo sprouting tray Mungo, in which you can grow up to three types of sprouts and microgreens at once, without using any growing medium.
How to grow sprouts
The simplest method for growing sprouts is to spread rinsed seeds in a shallow container and regularly rinse them with water until they germinate.
- First, cover the seeds with cold water and remove any impurities that float to the surface. Soak the seeds for 8-12 hours (overnight) or until the husks soften.
- Pour off all the water and let the seeds drain on a tray with drainage.
- Spread the seeds evenly, place the perforated tray on the base tray and leave the seeds to germinate in the fridge.
- Rinse the seeds every day with clean cold water and let them drain again until they germinate.
Growing equipment for growing sprouts
 How to grow microgreens
When growing microgreens, we do not soak the seeds, but sow them directly into a moistened growing medium. This can be mats made of mineral wool or other materials, or horticultural growing substrate that does not contain added nutrients (for example, seed and propagation substrate, light-mix, coconut substrate).
Microgreens also need a light source; you can grow them on a windowsill or use grow LED lights for microgreens. If you choose artificial lighting, it is more advantageous to grow microgreens in a grow tent, where they will have perfect conditions for growth and you will make better use of the electricity invested.
- Fill the tray with growing medium. If you are using soil or a similar substrate, fill the container to the brim and press it down lightly.
- Moisten the substrate with a sprayer.
- Sow the seeds very close together so that you achieve the richest possible harvest.
- Place the growing container on a window or under a grow LED light.
- Keep the substrate moist until it is time to harvest.
Growing equipment for growing microgreens
- tray or microgreens sowing tray
- growing medium (mineral wool growing mats or hemp fibres, perlan, horticultural substrate)
- hand sprayer
- grow LED light for microgreens (optional)
- grow tent for microgreens (optional)
How to choose seeds for growing sprouts and microgreens
A number of edible cereal species can be grown as sprouts or microgreens (barley, wheat, maize, oats, rice) or legumes (lentils, peas, chickpeas, beans). For growing sprouts and microgreens, use only seeds that have not been treated with pesticides or other chemical substances.
However, all sprouts and microgreens have one thing in common: they are packed with nutrients and flavour that will certainly pleasantly surprise you with its intensity. Do not be afraid to experiment and alternate plant species. You can also try various seed mixes for growing microgreens or our practical microgreens growing kits for beginners. To begin with, we include a list of our most popular sprouts and microgreens.
&nb