
Ventilation and Climate, Page 3
List of articles
Differences Between Axial and Radial Fans: What Are They and Why?
Unlike axial fans, radial fans also have no problem with fragments of activated carbon from filters. These properties have made them popular not only among home growers.
Is something unclear? Do you have a question? Write to us at info@higarden.eu We will be happy to expand the article with relevant questions.
Many growers try to save money on the fan they choose right from the start by opting for the cheapest fan possible, assuming that the choice of fan does not matter. As long as it has the required m3 per hour.
Unfortunately, it is not that simple. Fans differ in many respects, and behind that is, of course, mathematics and physics, which I will not present here, and if you wish, you can look it up on Google. ;-)
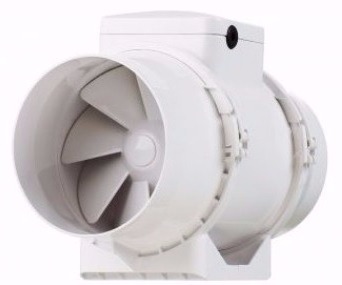
In practical terms, fans are divided into AXIAL (nicknamed toilet fans by some), typically represented by the TT and TD series, and RADIAL fans, which are further divided into fans with forward-curved blades, backward-curved blades and radially ended blades.
Unfortunately, it is not that simple. Fans differ in many respects, and behind that is, of course, mathematics and physics, which I will not present here, and if you wish, you can look it up on Google. ;-)
In practical terms, fans are divided into AXIAL (nicknamed toilet fans by some), typically represented by the TT and TD series, and RADIAL fans, which are further divided into fans with forward-curved blades, backward-curved blades and radially ended blades.
Axial TT fans are the cheapest you can find on the market, and if your ducting is no longer than 2 metres, you do not bend it, and you do not use any silencers, filters (yes, these "pipes" are in fact a significant obstacle to airflow), or any other components that restrict airflow, then TT fans will work quite successfully for several growing cycles.
TD fans are the same, but they use better bearings. The fan is better protected against clogging and generally achieves a much longer service life than TT fans, which is reflected in the price. Airflow for an axial fan is stated at zero pressure.
With one 90-degree bend, the pressure in the ducting increases by 10 Pa and the performance of the axial fan drops by approximately 25%. If you add, for example, a filter, the performance will drop by another 25%, and there is also a risk, in addition to insufficient fan performance, of insufficient cooling of the fan and burning out the thermal fuse. (If this happens, the manufacturer knows that the fan was operated improperly and will not accept the complaint.)
Another obstacle can even stop the airflow completely, and the fan will only "consume power" but do nothing.
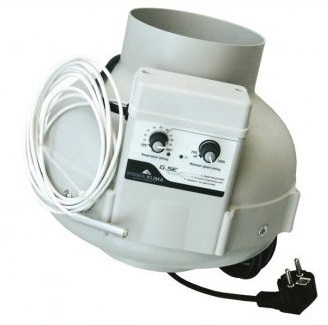
Radial fans, on the other hand, are designed for use in long ducting runs and, by their principle, create pressure that "pushes" air through obstacles and bends. This does not, of course, mean that your ducting can be infinitely long or that you can make a "snake" around the entire room and expect airflow not to be affected. Performance drops are in single-digit % for each obstacle, and under normal conditions, when you use a filter or silencer and have 2 bends in 10-metre ducting, you do not need to worry about the fan's performance or service life.
TD fans are the same, but they use better bearings. The fan is better protected against clogging and generally achieves a much longer service life than TT fans, which is reflected in the price. Airflow for an axial fan is stated at zero pressure.
With one 90-degree bend, the pressure in the ducting increases by 10 Pa and the performance of the axial fan drops by approximately 25%. If you add, for example, a filter, the performance will drop by another 25%, and there is also a risk, in addition to insufficient fan performance, of insufficient cooling of the fan and burning out the thermal fuse. (If this happens, the manufacturer knows that the fan was operated improperly and will not accept the complaint.)
Another obstacle can even stop the airflow completely, and the fan will only "consume power" but do nothing.
Radial fans, on the other hand, are designed for use in long ducting runs and, by their principle, create pressure that "pushes" air through obstacles and bends. This does not, of course, mean that your ducting can be infinitely long or that you can make a "snake" around the entire room and expect airflow not to be affected. Performance drops are in single-digit % for each obstacle, and under normal conditions, when you use a filter or silencer and have 2 bends in 10-metre ducting, you do not need to worry about the fan's performance or service life.
Unlike axial fans, radial fans also have no problem with fragments of activated carbon from filters. These properties have made them popular not only among home growers.
Is something unclear? Do you have a question? Write to us at info@higarden.eu We will be happy to expand the article with relevant questions.
To buy a fan with speed control or without?
When customers ask us whether they should choose a fan with control or not, we almost always answer in favour of controlled fans. Why?
In short: they are more practical. Estimating the optimal fan speed setting in advance is not easy. Many factors play a role, such as the temperature inside the tent, the temperature outside the tent, the location (in a cellar you will need to reduce the temperature less, in an attic more), humidity and more.
At the same time, the conditions in the tent change during the growing cycle (and during the day), and the ventilation must reflect that. The temperature outside the grow room also changes, so you draw in warmer or, conversely, colder air. Without control, it is really difficult to respond to either.
At the same time the controlled fan does not run at full power when it is not needed, so you save on energy.
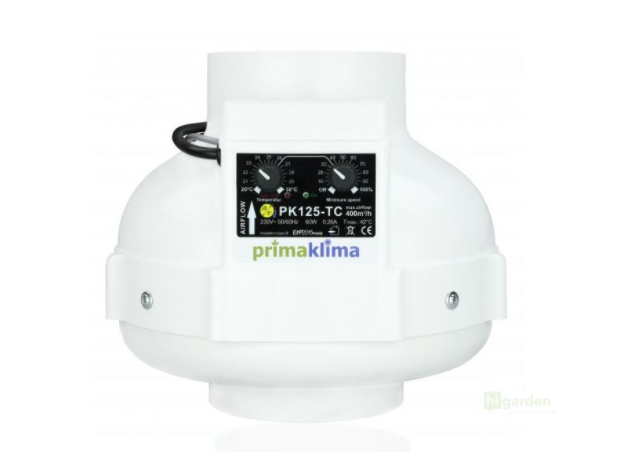
Some controllers (usually external ones) have adjustable hysteresis, so they do not react to a temperature change in an on-off manner, but when the temperature rises slightly, they slightly increase the speed so that the change is compensated. If the temperature keeps rising, they increase the output again. As a result, the temperature in the grow tent/room will move even closer to the optimal value you have chosen, and you can influence it effectively.
TIP: Is the fan running at full speed even with control? It is possible that you either have an insufficiently powerful fan or are bringing in air that is too warm.
These are the main reasons why we recommend fans either with built-in control, or at least adjustable ones, for which you can buy a controller separately. Of course, if you know the space in which you are growing well and are therefore going for certainty, a single-speed fan is not a problem and many people use them.
With an adjustable fan, you can better adjust the growing conditions for plants exactly to their needs. You thus have a much greater chance of achieving good results.
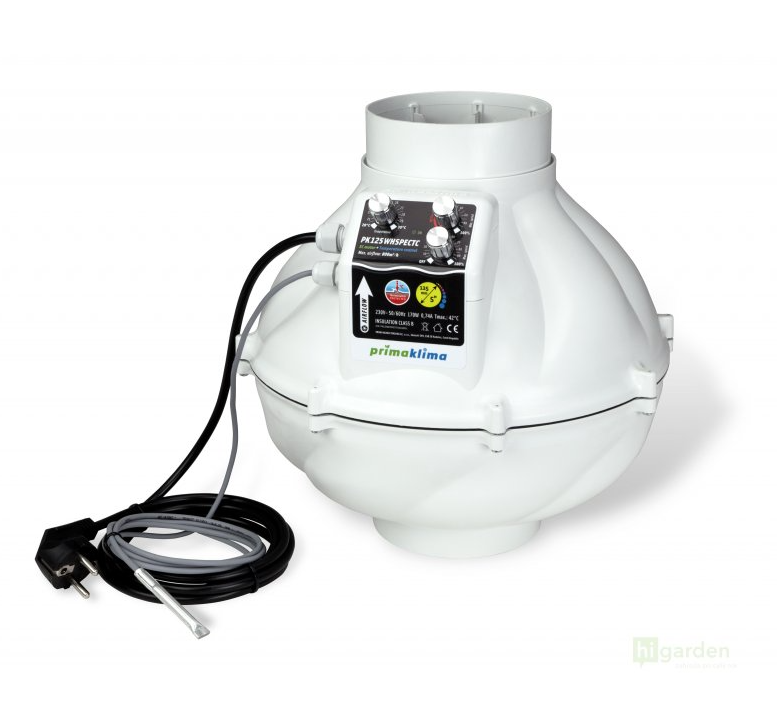
And which specific fan do we recommend? We have tested PrimaKlima fans, which are also popular among our customers. The PrimaKlima PK125-TC fan (400m3/h, 125mm) with thermostat is an unbeaten bestseller in its category.
Choosing a fan is not easy, and general advice is often not enough. We will be happy to advise you individually at info@higarden.eu and help you choose the type and power of fan.
We recommend:
- PRIMA KLIMA fan 400m3/h, 125mm, with thermal control (PK125-TC)
- Garden High PRO - PROFAN TT 125mm, 220-280m3/h, 2 speeds
Further articles:
How to Choose and Set Up Tent Ventilation
When growing indoor, unlike outdoor growing, you cannot rely on natural air circulation. It is therefore necessary to depend on more or less sophisticated ventilation equipment and ensure a sufficient supply of fresh air for the plants, more precisely oxygen and carbon dioxide. The heat generated by artificial lighting inside the grow box must, on the other hand, be extracted out of the growing space. Read on to find out how to assemble ventilation easily so that your herbs can breathe properly!
We choose ventilation mainly according to the size of the tent or room. The basis is a fan. You will also need an odour (carbon) filter and, of course, flexible ducting.
Experienced growers use smart control of ventilation, which is governed by temperature and air humidity. Automatic control will ultimately save you time and money, and above all help you achieve an excellent harvest with ease.
Let us start with odour filters. You can find out what to look for in a separate article. A common beginner’s mistake is incorrect placement. The following lines will help you extend the filter’s service life and, thanks to correct installation, ensure smooth operation as well. We recommend placing a classic carbon filter always inside the tent and then drawing air through it...
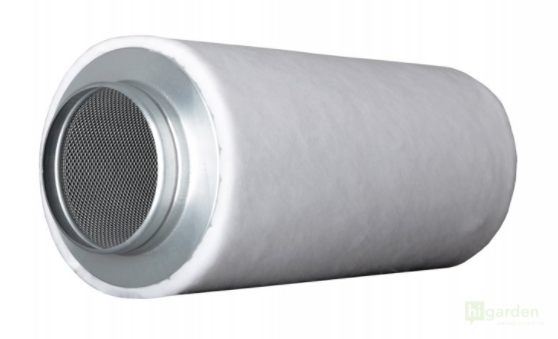
One of the best-selling odour filters on the market from the traditional Prima Klima brand.
The fan can also be inside the box, but it can also be outside; the key is that it should be positioned after the odour filter, as you can see in the picture. This is usually fitted with a pre-filter, which catches larger impurities, while the rest, such as odours or various microscopic impurities, is handled by activated carbon.
The opposite installation method is less common and requires the use of a inline carbon filter.
In general, we recommend ensuring that the filter always has a higher capacity than the fan, because although both components form an inseparable pair together, the carbon filter reduces the fan’s overall efficiency.
Fan
If you are planning to use a carbon filter and run ducting with more than one bend, we recommend a radial fan, whether with integrated control or without it. When it comes to home growing needs, it beats axial fans hands down.
Axial fan should be used rather for simple and short ducting. Filters and bends are obstacles that significantly reduce their performance when moving air.
Speed control, for example according to temperature, will also make the entire growing process much easier, because especially for a beginner it is not easy to set the fan during the growing cycle so that it ensures an optimal microclimate inside the grow box at every stage. And that is the goal, after all!
Prima Klima also manufactures first-class radial fans with temperature control.
Simply put, it does not pay to save on a fan at any cost, even at the start. The same certainly applies to fan noise, whether for your own comfort or your neighbour’s household. It is therefore necessary to bear in mind that the quieter you want the ventilation to be, the higher the purchase price will be. In reality, however, you would be hard pressed to find a grower who would regret not buying a noisier model without control, or even an odour filter, at the beginning...
An excellent helper for air circulation in the tent is a circulation fan. With a circulation fan, which ideally complements the main fan, your plants will not only breathe deeply, but will also be more vital and resilient thanks to the simulation of wind in the artificial growing environment. Practical clip-on fans are also ideal for smaller boxes.
When it comes to choosing ducting, the first consideration is again where your grow box is located and how audible the airflow may be. For large grow boxes, you will need ducting that can handle greater pressure as well. To begin with, for a smaller tent, basic flexible ducting will suffice. A completely discreet option is then the PhonicTrap ventilation ducting PhonicTrap.
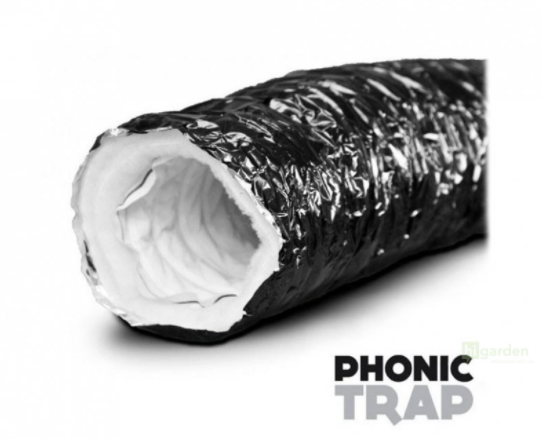
PhonicTrap flexible ducts are twice as effective as standard sound-dampened versions with glass wool. In addition, thanks to the absence of glass wool, there is no risk of contamination of your growing space.
We will be happy to help you choose ventilation, and do not hesitate to contact us when you are assembling your ventilation. We are here for you and our goal is your joy from growing. We look forward to your questions at the well-known address info@higarden.eu.
- Fans
- Flexible ducting
- Sound-dampened PhonicTrap ducting
- Carbon (odour) filter
How powerful a fan do you need?
Are you choosing ventilation equipment for a grow tent and wondering how powerful a fan will be just right for you? Today’s article will help you resolve this dilemma!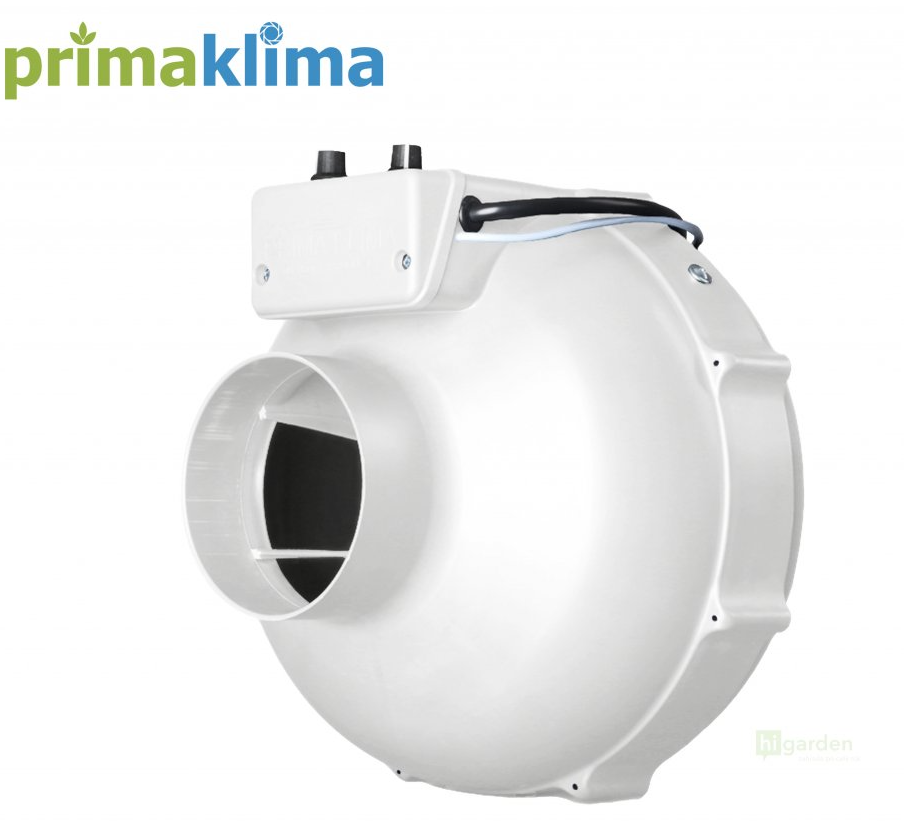
You probably already know that the presence of fresh air in any grow tent or room plays a key role in indoor gardening. Without a sufficient supply of oxygen and carbon dioxide, plants cannot develop healthily.
While in one of our next articles we will take a closer look at individual types of fans, for now our main concern is how powerful ventilation is appropriate with regard to individual growing plans and needs. It should unquestionably be an investment that pays off in the near future. If we look at the required fan output in relation to the output of artificial lighting, you may be pleased to know that there is a simple and proven conversion:
- 1 W of light source output = 1 m3/h fan output (i.e. air flow capacity per hour).
- In the past, high-pressure discharge lamps were especially popular, but these are now increasingly being replaced by modern LED luminaires, which, among other advantages, also have much lower heat emission and therefore you do not need such powerful ventilation.
- In the case of discharge lamps, such a conversion looks as follows: 400W discharge lamp requires an extract fan with an air flow capacity of at least 400 m3/h. To prevent negative pressure in the growing space, the extract fan needs to be supplemented with an intake VKO fan and, if greater output is needed, a TT fan. (If you need truly exceptionally high output, do not hesitate to contact us so that we can help you choose a fan with sufficient air draw.)
- The calculation method above for the required output of your new ventilation also takes into account the efficiency of the carbon filter and the presence of ducting up to 5 metres long.
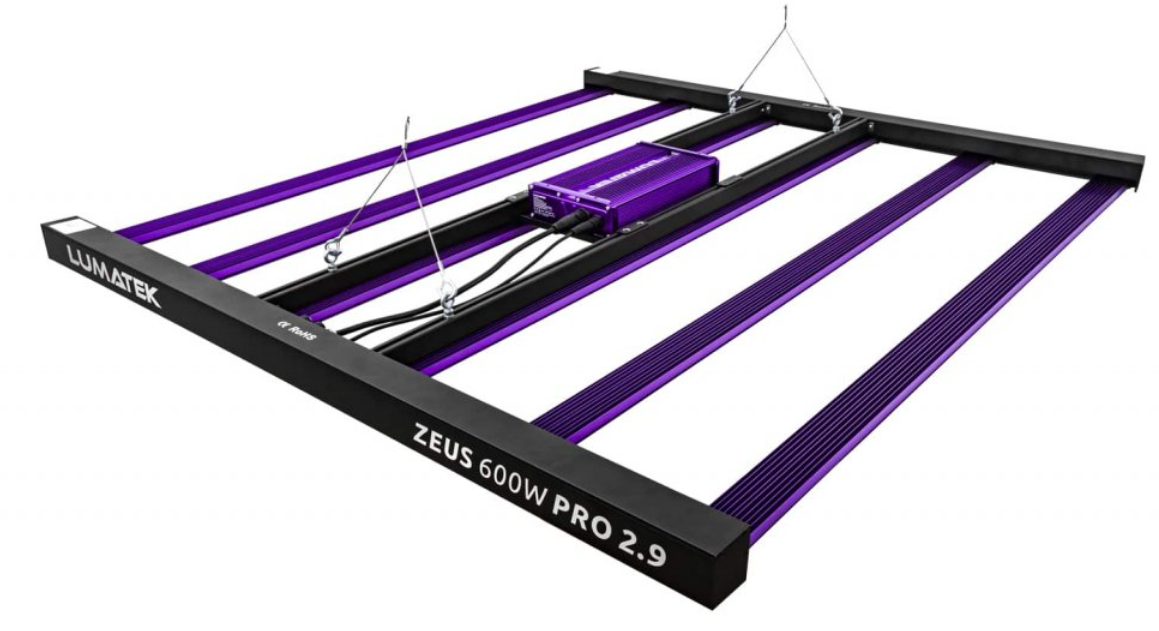 Our TIP: With LED technology in the Lumatek ZEUS 600W PRO 2.9 luminaire (pictured on the left), you have a guarantee of the best price-to-performance ratio on the market and, moreover, you do not need such a powerful fan as when growing under artificial light from a discharge lamp, because despite the high light intensity these modern luminaires emit much less heat.
As we have already indicated, discharge lamps are now making way in the market for significantly more advantageous sources of artificial lighting with LED technology. It is precisely when you use LED lighting as the source of artificial light in your grow box or indoor growing room, or alternatively CFL energy-saving lamps, that you will use a different way to identify the optimal fan strength. And this method is also useful if you use air-cooled reflectors in combination with discharge lamps.
- Add up the total air volume in the grow tent or growing room and multiply it by 40 for the extract fan. For an intake fan of the TT or VKO type, half the output is more than sufficient.
- Examples are useful, so if you have, for example, a grow box Mammoth Pro+ 120 with a volume of 2.88 m3, the minimum output for the extract fan will be calculated as 2.88 x 40.
Now you know that there is a fairly simple answer to the question “How do you calculate ventilation power?” But as they say, it is better to be safe than sorry, so you cannot go wrong by writing to us at the well-known e-mail address info@higarden.eu. We will be happy to advise you on everything related to ventilation equipment for indoor gardening. We look forward to your questions!
We also recommend these products:
- Lumatek ATS 300W PRO 2.7 (ATTIS)
- PRIMA KLIMA fan 400 m3/h, 125 mm, with thermal regulation
- Garden Highpro VKO 100, axial fan
What to read next?
It is getting colder! Get top-quality heating not only for winter
It is no longer T-shirt weather outside, which is also reflected in the colder air inside the house. During the cold months, it is necessary to maintain the optimal air temperature inside the greenhouse or growbox, among other reasons, so that you can prevent the occurrence of mould or other plant diseases. We will also advise you on what to use to heat water or irrigation solution in the tank.

- The magic of indoor gardening lies, among other things, in the fact that as a grower you can enjoy just as abundant a harvest in the middle of winter as in the middle of summer, in spring or in autumn. You only need to effectively balance the temperature difference.
- Prepare for temperature drops and prevent extra low temperatures and frosts, which arrive with the night not only in winter but also in early spring or later in autumn.
- The various types of heating units we will now show you will allow you to maintain a stable growing environment for your plants.
- Another important aspect of using the right heating is the possibility to prevent mould growth, which often appears in the cold months as a result of humidity and water condensation when growing indoors.
- Growing in a greenhouse? LightHouse ECOHEAT has long been our best-selling greenhouse heater. Growers and gardeners among our customers buy all the available variants, which differ mainly in wattage: 240W, 135W, 80W and 45W. In the description of the specific variant, you will find out how large an area the unit can realistically cover.
- This popular greenhouse version of tubular heating is characterised by very economical operation.
- In practice, you will also appreciate the installation flexibility of these heating units, as they are designed for easy mounting wherever it suits you best (wall, floor, etc.).
- The LightHouse brand will also please you if you need a powerful direct heater in a greenhouse or grow room.
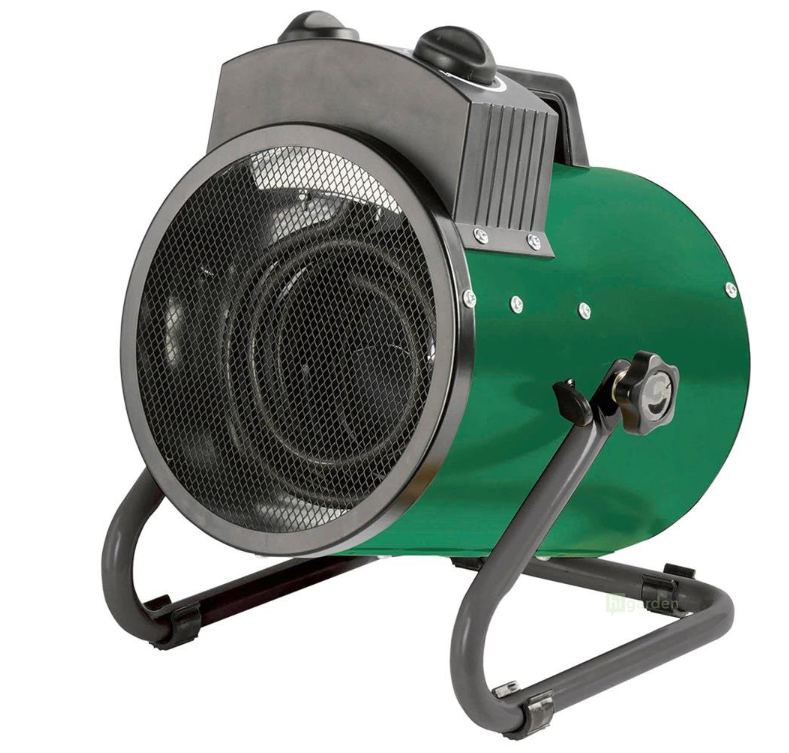
- The robust heater marked Greenhouse 3kW has an integrated fan, which efficiently distributes the warm air generated by a pair of heating elements throughout the space. This modern heater is equipped with a thermostat and allows growers to set different power configurations. And once the hot summer arrives, you simply switch the heater off, instantly turning a powerful direct heater into a powerful circulation fan. Handy, isn’t it?
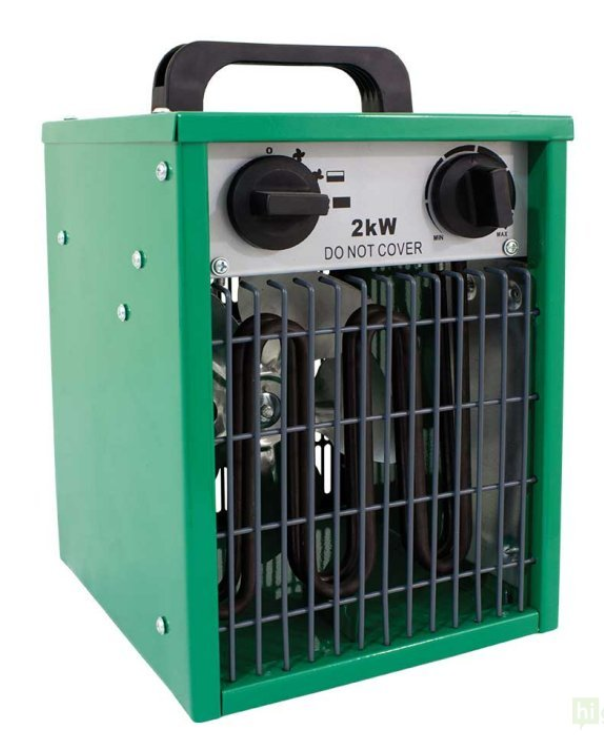
- If the Greenhouse direct heater has caught your interest, but you need a lower output, the very similar parameters, including the option of control via a wireless thermostat, are also offered by Greenhouse 2000W.
- LightHouse also manufactures oil radiators with an adjustable thermostat and overheating protection. Even better service is provided by oil-free radiators. Thanks to the practical thermostat, the temperature will never fall below the level that is critical for plants at a given stage of the growing cycle. The modern and discreet design also invites occasional use anywhere in the home.
If you are wondering what to use to heat water or nutrient solution in a tank, you no longer need to.
- The tank heater from the proven Boyu brand will serve you perfectly.
- In addition to a water tank or nutrient solution reservoir, it is also widely used as an aquarium heater.
- Choose the wattage based on the volume of the tank you use: 100W, 200W or 300W.
- You can safely submerge the Boyu tank heater completely in water and secure it thanks to the practical clips.
- With the built-in temperature controller, setting the required temperature is easy.
- The illuminated indicator light will then reassure you that everything is working as it should and that the water from the tank or the nutrient solution from the reservoir will please your plants without them suffering temperature shock.
If you have any questions about heating, please do not hesitate to send them to the well-known address info@higarden.eu. We will be happy to advise you!
We also recommend these products:
- Hutermann HD-250 air dehumidifier (1,499 Kč)
- TF420 - infrared heater 1200W, IPX4 (1,390 Kč)
- Mobile air conditioner, heater - heat pump and dehumidifier AC9000H (12,990 Kč)
What to read next?
- Dutch Mammoth in a new coat: taller and better!
- PRO-ECO VF carbon filters for reliable neutralisation of unwanted odours
- Stylish HOMEbox Ambient grow tents combine the pleasant with the useful
Winter is coming: add some heat and light for your plants
Autumn is already drawing irreversibly to a close, and the days will continue to get shorter. Help your plants survive this period without harm. We have tips for products that may come in handy at this time of year.
Supplementary heating
To ensure our plants do not suffer, it is a good idea to provide them with supplementary heating during the winter months; some would not even survive the winter without it. The tubular heating elements Urban Heater provide a stable environment during sudden fluctuations or low night-time temperatures. They are suitable, for example, for greenhouses, propagators or tents. They are perfectly resistant to splashes from sprayers or humidity.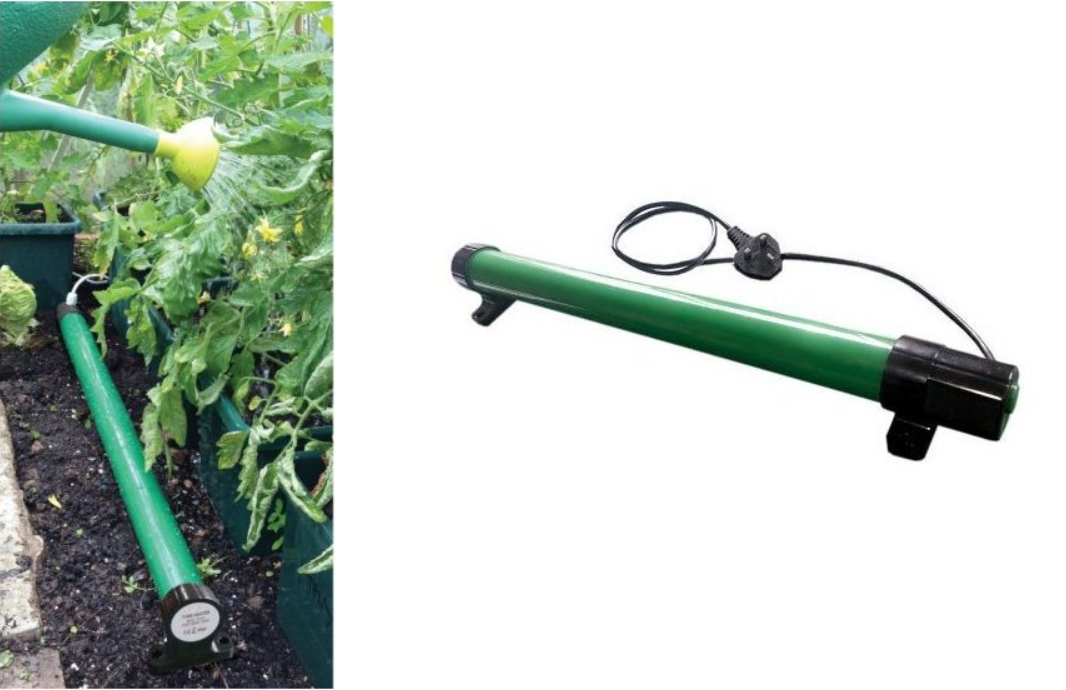
LightHouse Greenhouse fan heater is an electric heater with a built-in fan, which is very easy to operate. The heater contains two heating elements and its own thermostat with three heating modes. It is an excellent helper in the winter months for efficiently increasing temperatures in larger spaces. 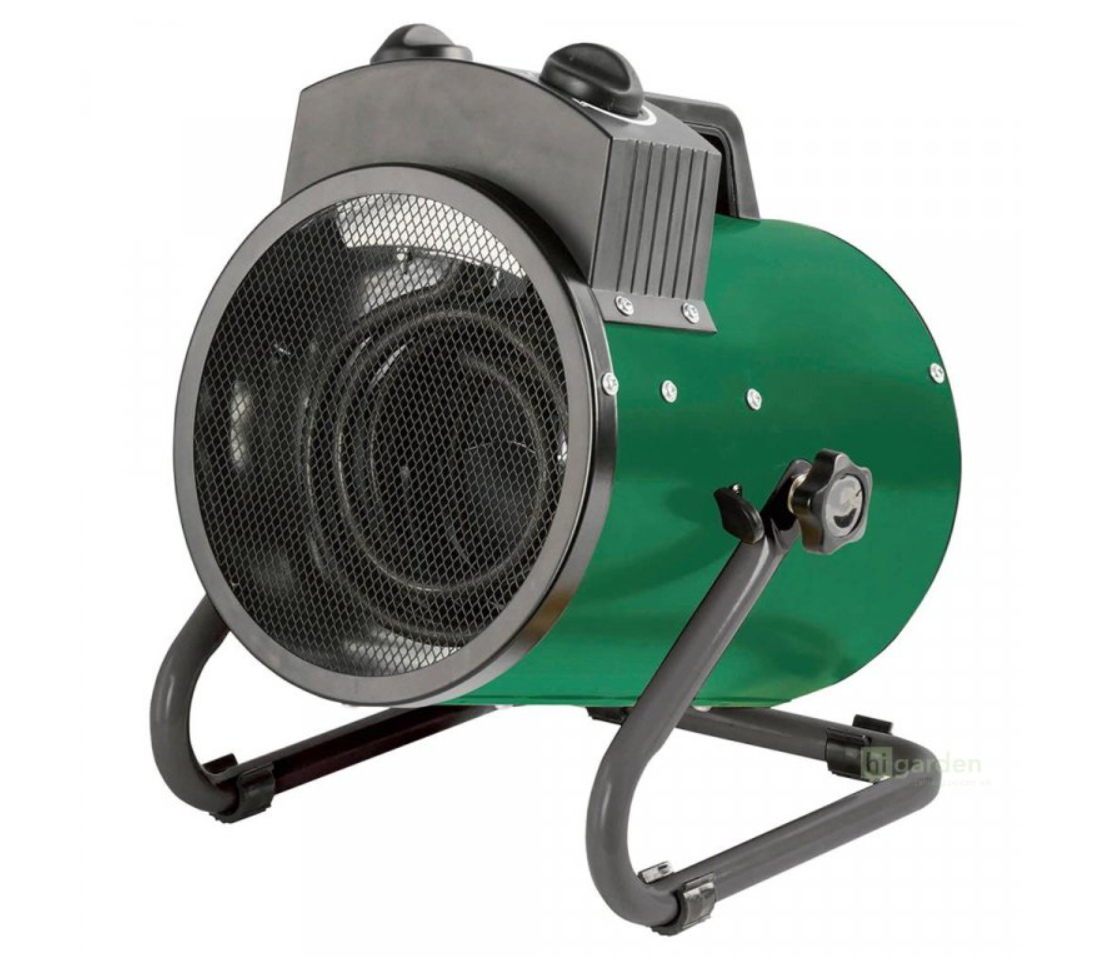
A thermostat is also an excellent helper for supplementary heating, as it prevents temperature fluctuations and thus damage to your flowers. Browse the thermostats in our range.
Supplementary lighting
Shorter and shorter days call for support for flowers; give your plants a longer day and more light, and they will reward you generously.
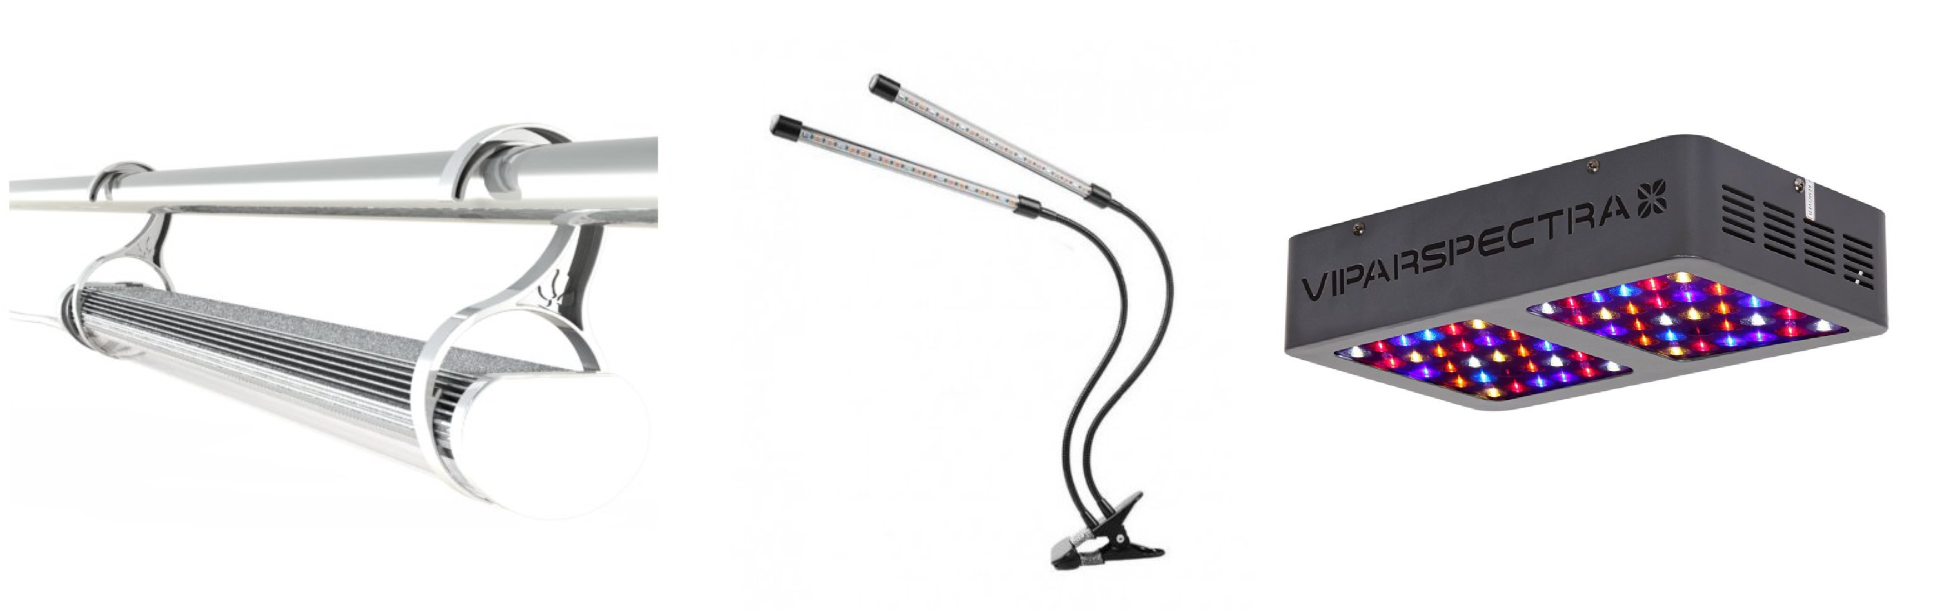
The first tip is TLED grow lightinggrowth TLED, which is designed for small growing spaces of around 0.8 m2. It can also be used as supplementary light where there is not enough from MH lamps. Thanks to its low heat output, it can be hung directly above plants without the risk of burning, and it is also energy efficient.
The practical LED 20 W lighting with a spectrum for growth and flowering consists of two separate LED strips with adjustable position, a timer and a switch between blue, red and combined spectrum. Its possible uses are truly wide. Thanks to the practical clip, it can be used above window boxes, in a propagator or directly above a standalone flowerpot.
The last selected light is GENT LED Photon 100W. This is very high-quality lighting with a spectrum for plants and vegetables. It offers excellent durability of up to 100,000 hours, which is up to 20 times more than HPS lamps. The light can also be controlled by a timer.
Humidifier or dehumidifier?
That is the question we answer in this article! Optimising growing spaces and climate control using suitable devices is absolutely essential for plant health, as you may already know from growing practice or from our previous blog posts.

Proper humidity inside a growbox or growing room is especially crucial when cultivating indoor plants. It depends both on the type of plants being grown and on the current developmental stage they are in.
Our TIP: In addition to the progress of the growing cycle, growers also deal with humidity as part of proper harvest storage. In this case, alongside modern devices that maintain the required humidity in storage areas, it is also possible to use simple but perfectly functional Integra Boost sachets to maintain ideal humidity directly inside the storage container. (You can read about how to store the harvest properly in a separate article HERE.)
We will now look at the use of devices for easy and reliable climate control in any space, which we already mentioned in the heading.
These devices require a power source and water to operate. Depending on how the water source is provided, we distinguish two types of humidifiers:
- Humidifiers with their own water source in the form of an integrated tank. An example is the best-selling ultrasonic humidifier HUMIPRO 4L. It is equipped with a clear LED panel and a double nozzle with 360° rotation. These humidifiers stand out for their simple operation and, last but not least, the option of output regulation, unlike the type of humidifiers mentioned below.
- Other humidifiers need water supplied externally, or rather a special head with a float must be immersed in it, which is either included in the package or can be purchased separately. A classic example is humidifiers that create the typical water mist, such as the Ultrasonic Mist Maker. These devices have a certain number of membranes, whose vibrations turn the water into mist. The output of these humidifiers depends precisely on the number of these membranes. For smaller growboxes and growing spaces, a humidifier with a single membrane will therefore be sufficient in practice, but there are also humidifiers with nine membranes for really large growing spaces.
- Unfortunately, there is no simple conversion from square metres of growing area to the number of membranes. There are other variables as well. It also depends on:
- The correct placement of the humidifier, meaning in the direction of airflow.
- The type and intensity of heating in the given room or grow box.
- The extract air, which also reduces humidity in the growing space.
- The placement of the grow box and the average ambient temperature.
- It should be added that occasional cleaning is sufficient; however, if you immerse Mistmakers in a sufficient amount of water, they allow almost continuous operation. That is a major advantage. The same applies to the blocking sensor for moments when the water in the tank runs out. The devices stop automatically and the membranes remain undamaged. The other side of the coin is the lack of output regulation, which means these devices always run at full power.
- Cloning and cuttings: “Humidifiers” are widely used for successful rooting of young plants during the early developmental stages, when it is necessary to maintain a minimum humidity of 60% in the growing space.
- Houseplants: A classic example of when a quality humidifier is invaluable is also flats and apartments, which are often overheated by central heating, especially in the colder months.

- You already know that in the case of young plants and clones, it is very important to maintain at least 60% humidity in the growing space. In later developmental stages, however, high humidity becomes harmful, and if plants are placed in a humid environment, for example in a later flowering stage, you risk the presence of mould. And fruit mould is the last thing you want to deal with in the late flowering stage.
- When it comes to the final quality of the harvest during drying, dehumidifiers again prove to be an irreplaceable helper, because you need to achieve the lowest possible humidity in the given room, and even increasing the fan speed to maximum is often not enough.
- An example of a practical dehumidifier that does not take up unnecessary space even in a grow box is the Hutermann HD-250 or its more powerful counterpart, the Hutermann HD-500.
- These devices stand out for their very economical operation, for which you no longer need any additional preparations.
- They work on the principle of drawing in moisture and then condensing it, with the water collecting in an integrated removable tank. Once the container is full, the device switches off automatically.
Our specialists will be happy to advise you on climate control, and especially on the long-term maintenance of optimal climate conditions not only in growing spaces. Please direct your questions to the well-known e-mail address info@higarden.eu.
We also recommend these products:
- Ultrasonic humidifier RAM 5L (1,299 Kč)
- Hutermann HD-500 air dehumidifier (1,999 Kč)
- Ultrasonic Mist Maker M12 humidifier (7,490 Kč)
What to read next?
ONA Block: solid odour absorber
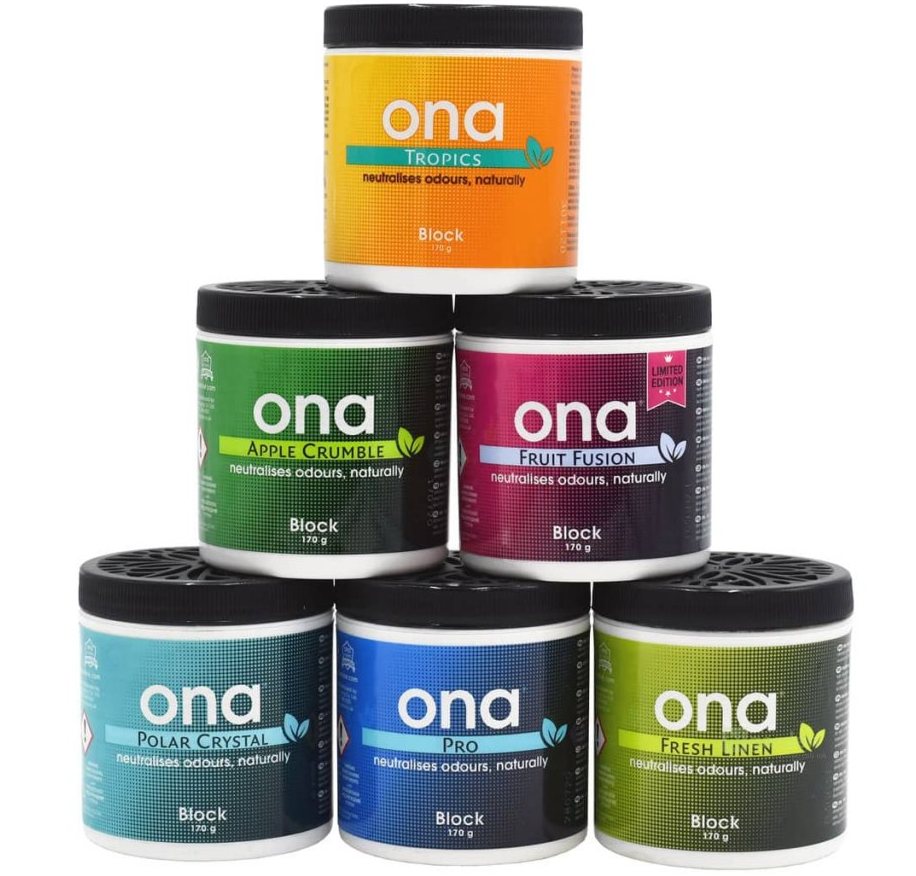
Since 1995, original solid odour absorbers have been manufactured in Canada. Why merely mask an odour when you can eliminate it outright? Each of the six fresh and fragrant variants is ideal for placement in smaller rooms and grow tents. And not only there!
Having a grow tent at home, equipped with proper ventilation with a carbon filter, usually does not mean a complete, 100% absence of unwanted odours. This is especially true during periods of increased humidity, associated with the late flowering stage and fruit ripening, when it is common to notice a slight but unwanted smell or residual aroma steadily drifting from the growing space.
Forget endless ventilation or masking the odour with products that are not worth it. The smart solution is precisely these neutralisers of organic and inorganic odours based on plant terpenes, which also have antiseptic and antibacterial effects!
By ensuring that odour molecules are not masked in the growing space, but eliminated, the oxygen saturation of the growing space also increases, which of course benefits the plants.
ONA Block solid odour absorbers are moreover much more practical than gel ones. Why?
- Solid structure (see below).
- More compact packaging. Thanks to their smaller dimensions, the containers (only 7.5 x 7.5 cm) are ideal not only for growing spaces, but also for small cupboards, cars or, for example, backpacks with used sports clothing or laundry baskets with dirty laundry. The use of ONA Block in everyday life is practically limitless.
- An attachment for placement in air ducting or a dispenser enhances the final effect.
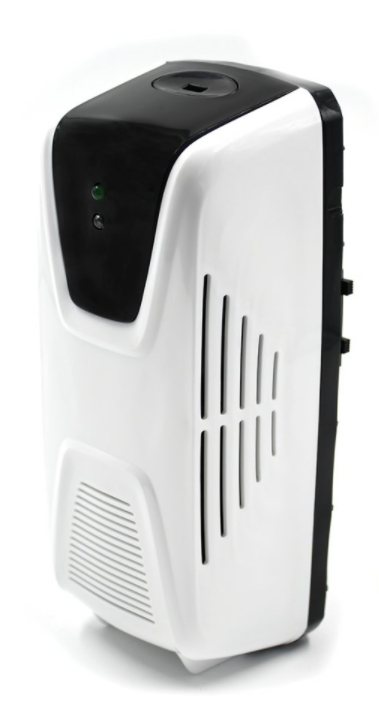
Using ONA Block in practice:
- The first option is to unscrew the lid, or make several holes in it, and let the neutraliser work freely in the chosen space, for example in a grow box. The solid structure of the solid odour absorbers does not prevent them from being removed from the packaging. You can therefore place the solid contents, for example, on the lid, which increases its effect when placed freely in the space. Placement near a fan is also recommended.
- For an even greater effect, you can use the special ONA Block Dispenser. Then all you need to do is switch on the fan.
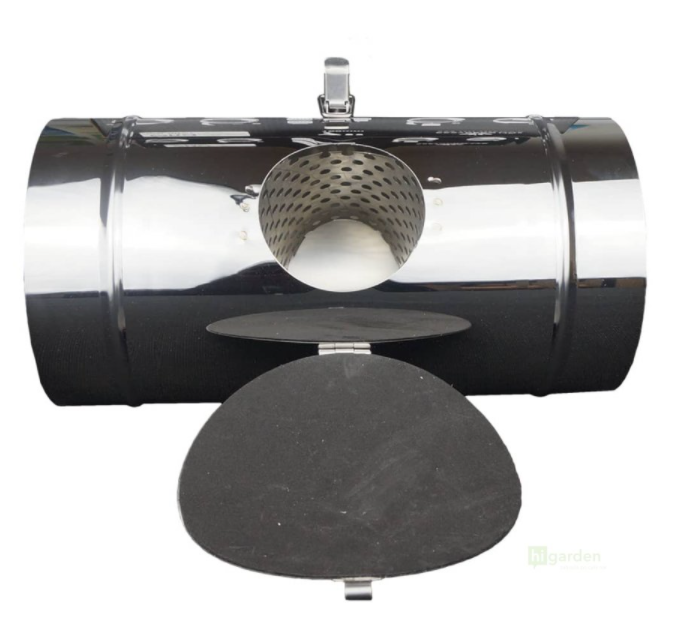
- The third option is to use the neutraliser attachment. How does it work?
- Depending on the width of the air duct in the grow box, choose the appropriate diameter of the ONA Odour Control Duct attachment.
- Then place it in the air duct anywhere behind the extraction fan, in the direction of airflow.
- The attachment has doors that simply need to be opened, and the contents of the ONA Block pack are inserted into the opening in the attachment. The doors then simply need to be closed again.
- The air leaving the growing space is odour-free and pleasantly scented, for example, like freshly washed laundry.
Are you interested in the various ways to use ONA Block odour absorbers? Then all that remains is to choose a variant based on the fragrance that suits you best. And if you have any questions, please do not hesitate to send them to the well-known e-mail address info@higarden.eu.
We also recommend these products:
- Shogun fertilisers (from 199 Kč)
- BioNova Bio Soilmix 50L (from 279 Kč)
- HERCULES aerated pots (from 49 Kč)
What to read next?