
Soil pH: how to determine, measure and adjust it
Soil pH determines how many nutrients plants actually obtain from the soil. In this article, you will learn what the pH value means, what pH tomatoes, chillies, basil and blueberries need as a general guide, how to measure soil pH with a soil pH metre or test, and how to safely raise or lower soil acidity.
What is soil pH?
pH indicates how acidic or alkaline the soil is. The scale ranges from 0 to 14:
- pH 7 is neutral,
- below 7 the soil is acidic,
- above 7 the soil is alkaline; calcareous soils are one example.
The scale is logarithmic. Soil with a pH of 5 is therefore roughly ten times more acidic than soil with a pH of 6. A difference of one whole unit is therefore significant for plants.
Why soil pH matters
pH does not feed the plant itself, but it determines which nutrients in the soil are available to roots. According to the UK’s Royal Horticultural Society (RHS):
- pH 6.1–7.0: the availability of the main nutrients is highest.
- Very acidic soil: calcium, potassium, magnesium and copper dissolve and leach out easily. Below pH 5.1, most phosphorus is unavailable to plants.
- Alkaline soil: the availability of phosphorus, iron and manganese decreases. A typical symptom is yellowing between the veins of young leaves (chlorosis).
If you fertilise and your plants still struggle, an unsuitable pH may be the cause. The fertiliser is present in the soil, but the plant cannot absorb it. The same principle applies to watering and hydroponics; see the article What pH should you choose for your nutrient solution?
What pH do plants need?
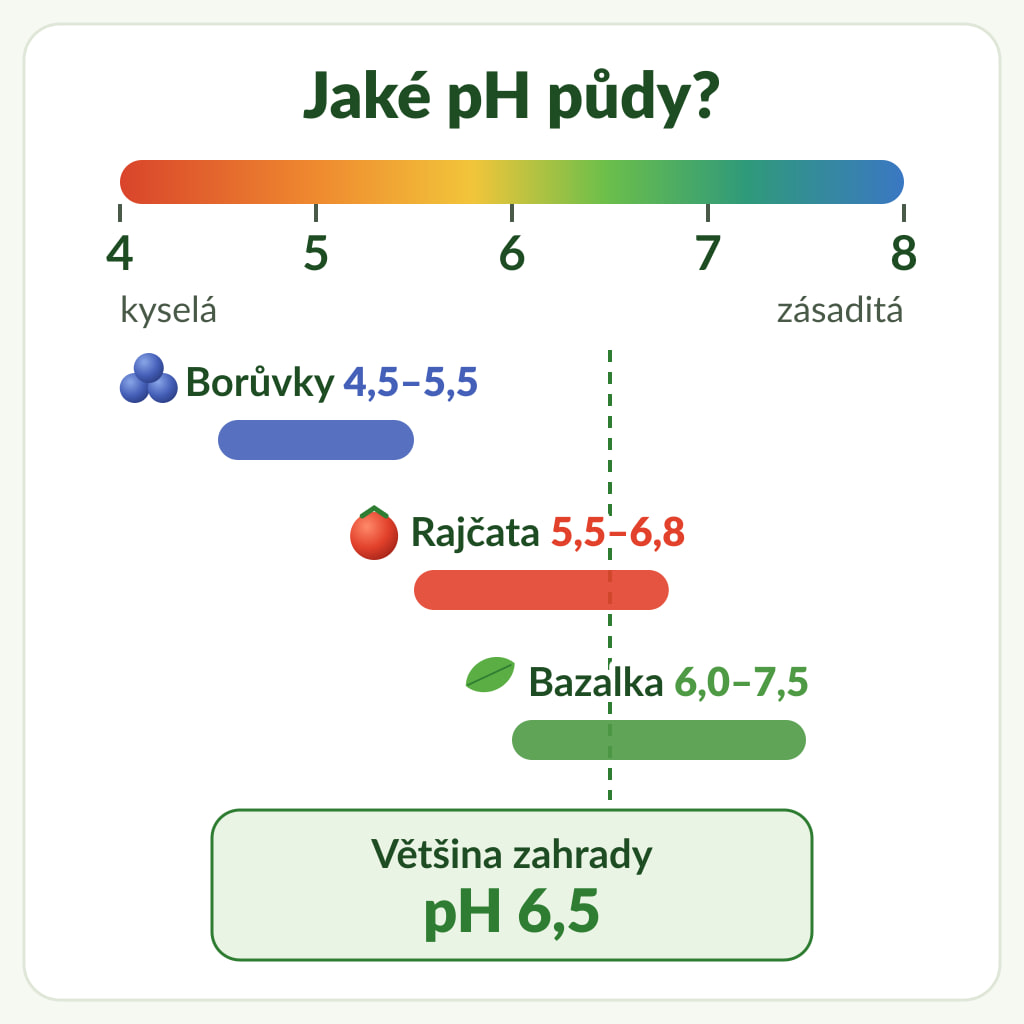
Most vegetables and herbs prefer slightly acidic to neutral soil. The RHS gives a pH of around 6.5 as the best universal value for a garden, at which a wide range of plants will grow well.
Acid-loving plants, such as blueberries, rhododendrons and heathers, are an exception. They need much more acidic soil and will turn yellow and weaken in neutral or calcareous soil.
These ranges are approximate. Sources differ in detail depending on the soil, climate and variety. Tolerance depends on the species and growing conditions; significant deviations can impair nutrient uptake and damage growth.
Approximate soil pH for common crops
| Crop | Recommended pH range | Target pH | Source |
|---|---|---|---|
| Tomatoes | 5.5–6.8 | 6.5 | Univ. of Hawaii, Univ. of Maryland |
| Peppers and chillies | 5.5–6.5 | 6.5 | Univ. of Hawaii, Univ. of Maryland |
| Cucumbers | 5.5–6.5 | 6.5 | Univ. of Hawaii, Univ. of Maryland |
| Lettuces | 6.0–7.0 | 6.5 | Univ. of Hawaii, Univ. of Maryland |
| Carrots | 5.5–6.5 | 6.0 | Univ. of Hawaii, Univ. of Maryland |
| Strawberries | 5.0–6.5 | 6.2 | Univ. of Hawaii, Univ. of Maryland |
| Basil | 6.0–7.5 | – | Univ. of Minnesota Extension |
| Blueberries | 4.5–5.5 | – | PNW Plant Disease Handbook, Michigan State Univ. |
| Rhododendrons, heathers and other acid-loving plants | 5.0–6.0 | – | RHS |
| Most gardens | 6.1–7.0 | 6.5 | RHS |
The ranges come from university and horticultural reference guides (University of Hawaii, the “The pH Preference of Plants” table; University of Maryland Extension, the target soil pH table for vegetables; RHS). Treat them as a general guide, not an exact prescription.
How to find out your soil pH: three measurement methods
You cannot reliably estimate soil pH from the plants growing there or from the soil’s colour. You need to measure it. There are three options to choose from, differing in accuracy, cost and convenience.
1. Soil pH metre with a probe
A digital soil pH metre with a probe designed for direct measurement is inserted into moist soil or substrate according to the device’s instructions; once the reading stabilises, it displays the value. You can take repeated measurements in many places and at any time during the season. The electrode needs to be calibrated and must not be allowed to dry out.
- Milwaukee MW101 PRO SOIL: a digital pH metre with an MA920B/1 soil electrode on a cable approximately 1 m long according to the manufacturer’s manual, a resolution of 0.01 pH and accuracy of +/-0.02 pH at 25 °C, with manual two-point calibration. Supplied in a case. For more demanding growers and field measurements.
- Bluelab pH Pen for soil measurements: a pocket-sized pen with a robust tip, accuracy of +/-0.1 pH at 25 °C, temperature measurement and a waterproof body. The cap filled with KCl solution protects the probe and can also be used to make a starter hole in the substrate.
- Aqua Master Tools S300 PRO 3.0: a pH metre and thermometer for substrates and liquids, accuracy of +/-0.1 pH, a replaceable electrode on a 120 cm cable and automatic two-point calibration.
2. Simple soil metres and a chemical test
A lower-cost option for a quick indication. Accuracy depends on the particular metre or test, how the sample is collected and whether the instructions are followed; before making a major pH adjustment, it is advisable to confirm the result with a laboratory analysis.
- Garland soil pH metre: according to the Higarden description, it measures the pH of soil, substrates and compost without batteries. Insert the probe into moist soil according to the instructions. According to the seller, it is not designed for liquids.
- 3-in-1 soil pH, humidity and light metre: according to the Higarden description, this is an analogue metre that requires no batteries. The Czech instructions supplied recommend inserting about two-thirds of the probe and waiting 5–10 minutes for a more accurate reading. Treat measurements of pH, humidity and light as approximate.
- Soil pH test (BEN-TEST): a chemical test with indicator solutions. According to the Higarden description, you mix a soil sample with water and reagents, then compare the colour with the scale; the test takes a few minutes. Follow the current instructions on the packaging.
3. Laboratory analysis
The most accurate option. Depending on the analysis you order, the laboratory will measure pH, the content of selected nutrients and may also recommend a liming dose. The RHS notes that a laboratory can also detect free lime (calcium carbonate) in the soil, which home tests often miss. This is useful when establishing a new garden or if you are unsure how to interpret the results of a home measurement.
Measuring soil pH step by step
Directly in the soil with a digital pH metre
- Calibrate the device according to the manufacturer’s instructions, usually first in pH 7 solution and then in pH 4 solution; some devices use pH 7 and pH 10 for the alkaline range. Milwaukee requires manual temperature compensation to be set according to the temperature of the sample being measured. The article How to use calibration solutions and pH metres explains how to do this.
- Moisten the soil. The electrode will not measure correctly in dry soil. If you need to add water, use distilled or deionised water and allow it to soak in; Bluelab recommends ideally waiting 24 hours before measuring a sample moistened this way. The soil should be moist, not waterlogged.
- Make a starter hole with a peg or the pen cap. Do not push a glass electrode into hard or stony soil, as this could damage it.
- Insert the probe to root depth, within the limits specified in the device instructions, and wait for the reading to stabilise.
- Measure in several places in the bed where the soil is similar and calculate an approximate average. Assess different parts of the garden separately; the pH can vary even over just a few metres.
- Rinse the electrode with clean water and store it in the cap with KCl storage solution. Do not let it dry out.
Collecting a sample for a test or laboratory
- Remove mulch, leaves and plant debris from the surface.
- Collect an even cross-section of soil from the surface to a depth of around 15–20 cm, not just soil from the bottom of a hole. For garden beds, the University of Maryland recommends 10–12 subsamples from different places; follow the instructions from the selected laboratory or test in preference.
- Mix the subsamples in a clean plastic container and remove stones and roots.
- Follow the test or laboratory instructions precisely. According to the description of the BEN-TEST on Higarden, put the sample into a beaker to a depth of about 1 cm, add distilled or rainwater to 3/4 full, add 10 drops of solution no. 1 and mix, then add 10 drops of solution no. 2 and compare the colour with the scale. Always check these general instructions against the current instructions on the packaging.
When to interpret the result with caution: within three months of liming, fertilising or incorporating compost. According to the RHS, the result may be misleading during this period; take recent applications into account when comparing measurements.
How to raise soil pH (reduce acidity)
You can adjust acidic soil by liming. The following are used:
- ground limestone (calcium carbonate), common “garden lime”, suitable for most gardens,
- dolomitic limestone, which supplies magnesium as well as calcium, and is suitable for soils deficient in magnesium,
- hydrated lime (calcium hydroxide), which acts quickly but irritates the skin and eyes.
The RHS provides approximate doses of ground limestone per m² for raising the pH to 6.5 when incorporated to a depth of 20 cm. Heavy clay soil needs more lime than light sandy soil:
| Initial pH | Clay soil | Loamy soil | Sandy soil |
|---|---|---|---|
| 6.0 | 0.6 kg/m² | 0.5 kg/m² | 0.4 kg/m² |
| 5.5 | 1.0 kg/m² | 0.8 kg/m² | 0.7 kg/m² |
| 5.0 | 1.4 kg/m² | 1.2 kg/m² | 1.0 kg/m² |
| 4.5 | 1.8 kg/m² | 1.5 kg/m² | 1.3 kg/m² |
- When: in winter or before planting; for vegetable beds, typically before winter digging.
- How: for doses above 0.5 kg/m², incorporate half into the soil and spread the rest over the surface after digging.
- What not to combine it with: the stated doses apply to garden-bed soil. Do not add lime to ready-made growing substrates without checking the pH and the manufacturer’s recommendations; some mixes already contain lime. Separate liming from manure and nitrogen fertiliser applications in time, following the product instructions, to limit nitrogen losses.
- Always follow the label: products vary in fineness and effectiveness, so follow the manufacturer’s recommendations.
How to lower soil pH (increase acidity)
Acidifying soil is slower and more difficult than liming. It is mainly worthwhile in neutral or slightly alkaline soil where you want to grow acid-loving plants.
- Sulphur is, according to the RHS, the most common, least expensive and gentlest product for plants. Soil microorganisms gradually convert it into sulphuric acid. Fine powder acts faster than granules. To reduce the pH from a neutral or slightly alkaline value to 6.0–6.5 in the top 15 cm, the RHS gives a rate of 135–270 g of sulphur per m² (the lower dose for sandy soil, the higher for clay soil). This is an approximate pre-planting soil adjustment; for beds that are already planted, determine the dose based on an analysis and the product instructions.
- Ferrous sulphate acts faster and supplies iron, but you need about eight times as much as sulphur.
- Do not use aluminium sulphate. With repeated use, aluminium can build up in the soil to toxic concentrations.
- Acidic, unlimed peat can lower pH, but the RHS no longer recommends it due to the protection of peatlands. For blueberries and other acid-loving plants in containers, use a ready-made substrate for acid-loving plants.
- Fertilisers with an acidifying effect, such as those containing nitrogen in ammonium form, can gradually lower pH and help maintain an acidic environment. Do not use them as a substitute for a larger pre-planting soil adjustment, or increase the dose beyond the manufacturer’s recommendation just to alter the pH.
Sulphur takes weeks to work, and months in winter. Apply it from spring to autumn and incorporate it into the soil before planting. If applied to the surface, it may take years for the pH to change at root depth. For blueberries, Michigan State University recommends incorporating sulphur at least one year before planting and checking the pH again before planting; a more substantial adjustment may take longer.
Beware of calcareous soils: if a soil sample fizzes when vinegar is dripped onto it, it contains free lime. Such soil is practically impossible to acidify. In that case, grow acid-loving plants in raised beds or containers.
Common mistakes
- Adjusting “by eye” without measuring. Measure first, then make adjustments. Unnecessary liming of alkaline soil will harm plants.
- One large dose instead of several smaller ones. Soil that is too acidic will damage plants. The RHS recommends adding sulphur gradually in smaller doses over several months.
- Measuring dry soil or immediately after fertilising. The result may be distorted.
- An uncalibrated or dried-out pH metre. Calibrate the electrode regularly and store it in a moist environment. Do not use tap water or distilled water for storage.
- One sample from one place. Soil pH varies across a garden, so measure in several places.
- Liming around acid-loving plants. Avoid unnecessary liming around blueberries and rhododendrons: raising the pH above their suitable range can impair nutrient uptake.
Frequently asked questions
How can I find out my soil pH at home?
At home, you can check soil pH approximately with a soil pH metre featuring a probe designed for direct measurement in moist soil; follow its instructions. A cheaper option is a chemical soil test, where you compare the colour of the solution with a scale. A laboratory analysis gives the most accurate result.
What is the ideal soil pH for vegetables?
Most vegetables and herbs prefer slightly acidic to neutral soil, approximately pH 6.0–7.0. The RHS gives pH 6.5 as the best universal value for a garden. Acid-loving plants such as blueberries are an exception.
How quickly does soil pH change after adjustment?
Slowly. Sulphur takes weeks to months to work, and longer in cold soil. Lime does not work immediately either. Adjust the timing of your check according to the product used and its instructions. Assess the effect of sulphur after several months; also check the pH before planting blueberries. After liming, fertilising or adding organic matter, allow for the possibility of a distorted result for three months, according to the RHS.
How often should I measure soil pH?
For garden beds, once a season is usually sufficient, ideally before planting. Measure more often when adjusting the pH or if plants are turning yellow and growing poorly.
Can I measure soil pH with a pH metre for water?
Do not push an ordinary pen designed for solutions into soil, as this could damage the electrode. Use a pH metre with a probe designed for substrates. You can use a pen designed for water only to measure an extract from a soil sample, following the instructions.
Choose a soil pH metre
For accurate, repeated measurements, we recommend a digital device such as the Milwaukee MW101 PRO SOIL, Bluelab pH Pen for soil or Aqua Master Tools S300 PRO 3.0. For a quick indication in the garden, the Garland soil pH metre, BEN-TEST soil pH test or 3-in-1 pH, humidity and light metre will be sufficient.
Find our full range in the pH metres category.